
Updating LinuxCNC to a new minor release (ie to a new version in the same stable series, for example from 2.9.7 to 2.9.8) is an automatic process if your PC is connected to the internet. You will see an update prompt after a minor release along with other software updates. If you don’t have an internet connection to your PC see Updating without Network.
1. Actualizar a la nueva versión
Esta sección describe cómo actualizar LinuxCNC de la versión 2.8.x a la nueva versión 2.9.y. Se supone que tiene una instalación 2.8 existente que quiere actualizar.
Para actualizar LinuxCNC desde una versión anterior a 2.8, primero debe actualizar su instalación anterior a 2.8; luego siga estas instrucciones para actualizar a la nueva versión.
Si no tiene una versión anterior de LinuxCNC para actualizar, entonces es mejor hacer una nueva instalación de la nueva versión como se describe en la sección Obtener LinuxCNC.
Furthermore, if you are running Ubuntu Precise, Debian Wheezy or Debian Buster it is well worth considering making a backup of the "linuxcnc" directory on removable media and performing a clean install of a newer OS and LinuxCNC version as these releases were EOL in 2017, 2018 and 2022 respectively. If you are running on Ubuntu Lucid then you will have to do this, as Lucid is no longer supported by LinuxCNC (it was EOL in 2013).
Para actualizar versiones principales como 2.8 a 2.9 cuando tiene una conexión de red en la máquina, necesita deshabilitar las fuentes apt antiguas de linuxcnc.org en el archivo /etc/apt/sources.list y agregar una nueva fuente apt linuxcnc.org para 2.9, luego actualice LinuxCNC.
Los detalles dependerán de la plataforma en la que se esté ejecutando. Abra una terminal y escriba lsb_release -ic para encontrar esta información:
lsb_release -ic
Distributor ID: Debian
Codename:       Trixie
You should be running on Debian Bullseye, Bookworm or Trixie or Ubuntu 20.04 "Focal Fossa" or newer. LinuxCNC 2.9.y will not run on older distributions than these.
También necesitará verificar cuál kernel de tiempo real esta usando:
uname -r
6.1.0-10-rt-amd64
Si ve (como arriba) -rt- en el nombre del kernel, entonces está ejecutando el preempt-rt kernel y debería instalar la versión "uspace" de LinuxCNC. También debe instalar uspace para configuraciones "sim" en kernels que no son en tiempo real.
Si ve -rtai- en el nombre del kernel entonces está ejecutando RTAI tiempo real. Consulte a continuación la versión de LinuxCNC a instalar. Los paquetes RTAI están disponibles para Bookworm y Buster pero no actualmente para Bullseye.
1.1. Configuración de fuentes apt
-
Abra la ventana
Fuentes de software. El proceso para hacer esto se diferencia ligeramente en las tres plataformas soportadas:-
Debian:
-
Haga clic en
Menú de aplicaciones, luego enSistema, luego enAdministrador de paquetes Synaptic. -
En Synaptic, haga clic en el menú
Configuración, luego haga clic enRepositoriospara abrir la ventanaRepositorios.
-
-
Ubuntu Precise:
-
Haga clic en el icono
Dash Homeen la esquina superior izquierda. -
En el campo
Buscar, escriba "software", luego haga clic en el iconoUbuntu Software Center. -
En la ventana del Centro de software de Ubuntu, haga clic en el menú
Editar, luego haga clic enFuentes de software ...para abrir la ventanaFuentes de software.
-
-
Ubuntu Lucid:
-
Haga clic en el menú
Sistema, luego enAdministración, luegoAdministrador de paquetes Synaptic. -
En Synaptic, haga clic en el menú
Configuración, luego haga clic enRepositoriospara abrir la ventanaFuentes de software.
-
-
-
En la ventana
Fuentes de software, seleccione la pestañaOtro software. -
Eliminar o desmarcar todas las entradas de linuxcnc.org antiguas (dejar todas las demas líneas no-linuxcnc.org como estan).
-
Haga clic en el botón
Agregary agregue una nueva línea apt. La linea será ligeramente diferente en las diferentes plataformas:
| SO / Versión tiempo real | Repositorio |
|---|---|
Debian Bullseye - preempt |
|
Debian Bookworm - preempt |
|
Debian Bookworm - RTAI |
|
Debian Trixie - preempt |
|
Debian Trixie - RTAI |
|
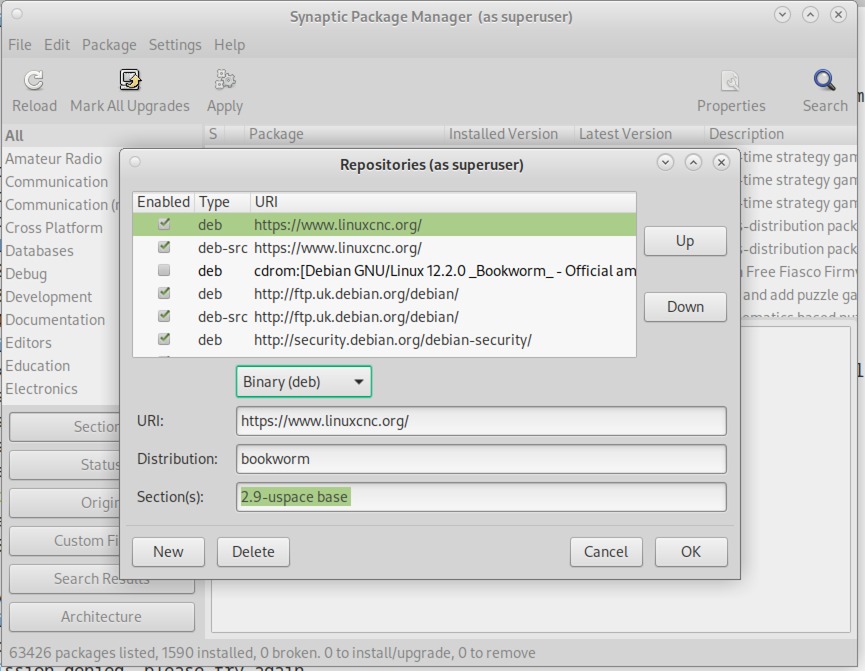
-
Haga clic en
Agregar fuente, luego` Cerrar` en la ventana de Fuentes de software. Si aparece una ventana que le dice que la información sobre el software disponible está desactualizada, haga clic en el botónRecargar.
1.2. Actualizando a la nueva versión
Ahora su computadora sabe dónde obtener la nueva versión del software. A continuación tenemos que instalarlo.
El proceso nuevamente difiere según su plataforma.
1.2.1. Debian Bullseye, Bookworm and Trixie
Debian usa el gestor de paquetes Synaptic.
-
Abra Synaptic usando las instrucciones en Configurando fuentes apt más arriba.
-
Haga clic en el botón
Recargar. -
Use la función de búsqueda para buscar
linuxcnc. -
Para kernels RTAI el paquete se llama "linuxcnc" y para preempt-rt se llama "linuxcnc-uspace".
-
Haga clic en la casilla de verificación para marcar los paquetes linuxcnc y linuxcnc-doc-* para actualización. El administrador de paquetes puede seleccionar un número de paquetes adicionales que también se instalarán, para satisfacer las dependencias que tiene el nuevo paquete linuxcnc.
-
Haga clic en el botón
Aplicary deje que su computadora instale el nuevo paquete. El viejo paquete linuxcnc se actualizará automáticamente al nuevo.
1.3. Ubuntu
-
Haga clic en el icono
Dash Homeen la esquina superior izquierda. -
En el campo
Buscar, escriba "actualizar", luego haga clic en el iconoAdministrador de actualizaciones. -
Haga clic en el botón
Verificarpara obtener la lista de paquetes disponibles. -
Haga clic en el botón
Instalar actualizacionespara instalar las nuevas versiones de todos los paquetes.
2. Actualización sin red
Para actualizar sin una conexión de red, necesita descargar un paquete .deb y luego instalarlo con dpkg. Los .deb se pueden encontrar en https://linuxcnc.org/dists/ .
Tiene que profundizar en el enlace anterior para encontrar el deb correcto para su instalación. Abra una terminal y escriba lsb_release -ic para encontrar el nombre de su sistema operativo.
> lsb_release -ic
Distributor ID: Debian
Codename:       trixie
Pick the OS from the list then pick the major version you want like 2.9-rt for RTAI or 2.9-uspace for preempt-rt.
Next pick the type of computer you have: binary-amd64 for 64-bit PC or binary-arm64 (64bit) for Raspberry Pi.
Next pick the version you want from the bottom of the list like linuxcnc-uspace_2.9.8_amd64.deb (choose the latest by date). Download the deb and copy it to your home directory. You can rename the file to something a bit shorter with the file manager like linuxcnc_2.9.8.deb then open a terminal and install it with the package manager with this command:
sudo dpkg -i linuxcnc_2.9.8.deb
3. Actualización de archivos de configuración para 2.9
3.1. Manejo estricto de intérpretes enchufables
Si sólo ejecutas código G normal y no sabes qué es un intérprete enchufable entonces esta sección no te afecta.
Una prestación de LinuxCNC que se usa rara vez es el soporte de intérpretes enchufables, controlados por la configuración INI no documentada [TASK]INTERPRETER.
Versiones de LinuxCNC anteriores a 2.9.0 manejaban una configuración incorrecta de [TASK]INTERPRETER que caía en automático de vuelta al uso del intérprete de código G predeterminado.
Desde 2.9.0, un valor incorrecto de [TASK]INTERPRETER provocará que LinuxCNC se niegue a arrancar. La situación se arregla eliminando dicha configuración del archivo INI, para que LinuxCNC use el intérprete de código G predeterminado.
3.2. Canterp
Si sólo ejecutas código G normal y no usas el intérprete enchufable canterp entonces esta sección no te afecta.
En el extremadamente improbable evento de usar canterp, debes saber que el módulo has sido movido de /usr/lib/libcanterp.so a /usr/lib/linuxcnc/canterp.so, y por lo tanto se necesita modificar la configuración correspondiente [TASK]INTERPRETER de libcanterp.so a canterp.so.
3.3. Spindle limits in the INI
Ahora es posible agregar configuraciones a la sección [SPINDLE] del archivo INI
MAX_FORWARD_VELOCITY = 20000 La velocidad máxima del husillo (en rpm)
MIN_FORWARD_VELOCITY = 3000 La velocidad de husillo mínima (en rpm)
MAX_REVERSE_VELOCITY = 20000 This setting will default to MAX_FORWARD_VELOCITY if omitted.
MIN_REVERSE_VELOCITY = 3000` This setting is equivalent to MIN_FORWARD_VELOCITY but for reverse spindle rotation. It will default to the MIN_FORWARD_VELOCITY if omitted.
INCREMENT = 200 Sets the step size for spindle speed increment / decrement commands. This can have a different value for each spindle. This setting is effective with AXIS and Touchy but note that some control screens may handle things differently.
HOME_SEARCH_VELOCITY = 100 - Accepted but currently does nothing
HOME_SEQUENCE = 0 - Accepted but currently does nothing
4. Updating Configuration Files for 2.10.y
Touchy: las entradas de Touchy MACRO ahora deben ser colocadas en la sección [MACROS] de INI, en vez de la sección [TOUCHY]. Esto es parte de un proceso de encomunar las configuraciones INI entre GUIs.
5. Preview renderer now requires OpenGL 3.3 core
The G-code preview shared by AXIS, the GTK screens (Gremlin / gmoccapy / gscreen / GladeVCP hal_gremlin / QtPlasmaC), and QtVCP was rewritten to use a single modern OpenGL 3.3 core-profile renderer (shaders, VBOs, an offscreen framebuffer for click selection, a glyph-atlas for overlay text). The legacy fixed-function path (display lists, immediate mode, GL_SELECT picking, glBitmap text, line stipple, GL_LIGHTING) has been removed. There is no runtime switch and no in-process fallback.
Hardware requirement. OpenGL 3.3 core is needed. On the supported platform (Linux with Mesa) this is available on Intel Sandy Bridge (2011) and newer, AMD r600 and newer, and nouveau. Machines without a capable GPU can use Mesa’s software renderer (llvmpipe), which handles the line-dominated preview acceptably:
LIBGL_ALWAYS_SOFTWARE=1 linuxcnc myconfig.ini
If a core context cannot be created the GUI exits at start-up with a diagnostic naming the OpenGL 3.3 requirement and suggesting LIBGL_ALWAYS_SOFTWARE=1, rather than starting with a blank or corrupt preview.
|
Warning
|
BREAKING: out-of-tree screens that inject raw legacy OpenGL
Custom screens that subclass the in-tree preview classes and override a drawing internal to emit raw fixed-function OpenGL (immediate mode, display lists, |
The immediate-mode drawing helpers used by the old renderer remain available for compatibility (linuxcnc.draw_lines, linuxcnc.line9, linuxcnc.draw_dwells, linuxcnc.positionlogger.call()); they are unused by the in-tree GUIs, which bake geometry to VBOs and upload the backplot from positionlogger.points(), but still work for out-of-tree tools under a legacy/compatibility context.
5.1. Notes for integrators and driver authors
-
AXIS / Togl. The vendored Togl widget (
src/emc/usr_intf/axis/extensions/togl.c) gained a boolean-coreprofileoption (default false). When true it creates the context withglXChooseFBConfig+glXGetVisualFromFBConfig
glXCreateContextAttribsARB(OpenGL 3.3 core), raising a descriptive Tcl error on failure. AXIS always enables it. The default (false) path is unchanged, sovismachand any out-of-tree Togl users keep their legacy contexts. -
Gremlin (GTK). GTK3 only hands out core contexts through
GtkGLArea, so the gremlin widget still builds its context by hand via GLX, now requesting 3.3 core withglXCreateContextAttribsARB. PyOpenGL cannot resolve that extension entry point (it comes back as a null function), so gremlin loadslibGLdirectly withctypesand creates and binds the context (choose-fbconfig / make-current / swap) through that one handle to avoid mixing context pointers. -
Line width in core profiles. A forward-compatible core context (Qt requests one) rejects
glLineWidth(> 1)withGL_INVALID_VALUEeven thoughGL_ALIASED_LINE_WIDTH_RANGEreports a larger maximum. The renderer probes the accepted width once and caches it, so thick lines (the selection highlight, dwell markers) degrade to 1 px on such drivers instead of raising; a non-forward-compatible core context (AXIS’s Togl, Gremlin’s GLX) keeps the wider lines. Thick lines via quad expansion are a possible future improvement. -
vismach is unaffected: it keeps its legacy Togl context and immediate-mode drawing; only its camera consumes the (now GL-free) explicit matrices from
glnav.
5.2. How the preview is put together
The drawing itself lives in lib/python/rs274/glcanon_scene.py, in four tiers. Nothing here changes what the preview looks like; it is where to start reading if you need to fix or extend one part of it.
-
Parts. One class per drawing concern - grid, program geometry, extents, bounding box, offsets, small origin, axes, machine-limits box, tool, live backplot, DRO overlay, the
user_plot()hook. A part draws that one thing and nothing else. Adding a preview element means adding a part and placing it in the scene’s order, not editing an existing part. -
The scene.
PreviewSceneholds the parts in draw order and runs them. Visibility is decided by the scene, not the part: it evaluates each part’svisible(ctx)and simply does not call a part whose gate is false, sodraw()may assume it is visible and must not open with anif not shown: return. Gates that couple parts belong to the scene too - the extents-versus-bounding-box either/or, and the translucent compositingprogram_alphawraps the program in. -
Primitives. Services several parts share - a line array, a wireframe box, Hershey vector text, the tool-cone mesh - reached as
ctx.prim. Letters are a primitive that axes, extents and offsets all use, not a sibling of "axes". -
Passes. The preview is three sets of depth/blend state, not an arbitrary order: world geometry, translucent geometry drawn over it at equal depth, and the screen-space overlay. Each part declares its
pass_; the scene sets the state when the pass changes. A part that needs something else for its own drawing (the tool’s constant-alpha blend) restores it afterwards.
Transforms go through a scoped model-view stack: with ctx.mv.push(): restores the previous transform on exit, including when an exception unwinds through it, so a part cannot leak a transform onto a later one. Offsets, small origin and axes share one such scope (RelativeCoordGroup), because the axes are drawn in the offset frame the offsets progressively build.
Parts read a FrameContext - an explicit, enumerated list of machine, view and renderer state, built once per frame by GlCanonDraw - rather than the widget itself. That is what lets them be tested without a window: build a context by hand, call part.draw(ctx), and assert on the vertices it emitted. See tests/glcanon-scene/.
Click-to-select is not a part - it draws nothing to the screen. Picker renders the same program geometry into an offscreen framebuffer with line numbers encoded as colour and resolves the nearest hit; GlCanonDraw.select(x, y) delegates to it. It shares one ProgramGeometry with the drawing part, so the pickable geometry and the drawn geometry cannot drift apart.
Setting GLCANON_SCENE_DEBUG=1 logs which parts the scene drew and which it skipped whenever that split changes, and reports depth/blend state a part left behind.
6. New HAL components
6.1. Non-Realtime
mdro mqtt-publisher pi500_vfd pmx485-test qtplasmac-cfg2prefs qtplasmac-materials qtplasmac-plasmac2qt qtplasmac-setup sim-torch svd-ps_vfd
6.2. En tiempo real
anglejog div2 enum filter_kalman flipflop homecomp limit_axis mesa_uart millturn scaled_s32_sums tof ton
7. New Drivers
A framework for controlling ModBus devices using the serial ports on many Mesa cards has been introduced. http://linuxcnc.org/docs/2.9/html/drivers/mesa_modbus.html
A new GPIO driver for any GPIO which is supported by the gpiod library is now included: http://linuxcnc.org/docs/2.9/html/drivers/hal_gpio.html