1. Einführung
PyVCP, Python Virtual Control Panel, wurde entwickelt, um dem Integrator die Möglichkeit zu geben, die AXIS-Schnittstelle mit Schaltflächen und Anzeigen für spezielle Aufgaben anzupassen.
Hardware-Maschinenbedienfelder können eine Menge E/A-Pins belegen und teuer sein. Hier haben virtuelle Control Panels den Vorteil, dass es nichts kostet, ein PyVCP zu erstellen.
Virtuelle Bedienfelder können zum Testen oder Überwachen verwendet werden, um reale E/A-Geräte beim Debuggen der Kontaktplanlogik vorübergehend zu ersetzen oder um ein physisches Bedienfeld zu simulieren, bevor Sie es bauen und mit einer E/A-Platine verbinden.
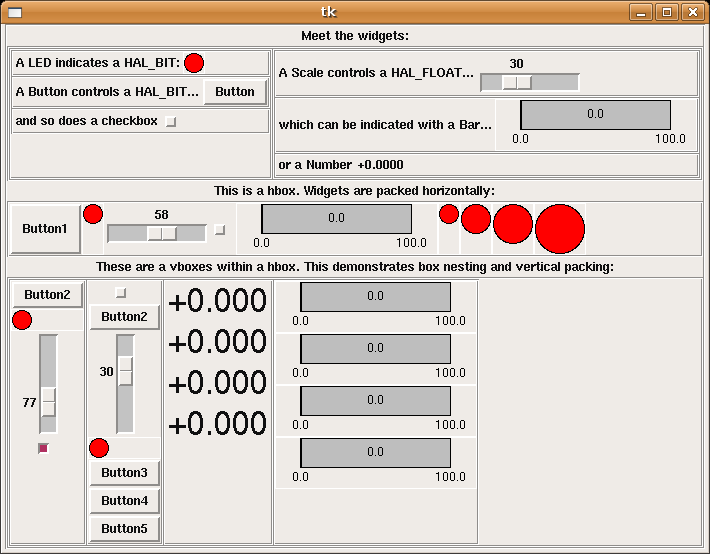
Die folgende Grafik zeigt viele der PyVCP-Widgets.
2. Panel Konstruktion
Das Layout eines PyVCP-Panels wird mit einer XML-Datei festgelegt, die Widget-Tags zwischen <pyvcp> und </pyvcp> enthält. Zum Beispiel:
<pyvcp>
    <label text="This is a LED indicator"/>
    <led/>
</pyvcp>

Wenn Sie diesen Text in eine Datei mit dem Namen tiny.xml einfügen und Folgendes ausführen
halcmd loadusr pyvcp -c mypanel tiny.xmlPyVCP erstellt das Panel für Sie, das zwei Widgets enthält, ein Label mit dem Text This is a LED indicator (Dies ist eine LED-Anzeige) und eine LED, die den Zustand eines HAL-BIT-Signals anzeigt. Es wird auch eine HAL-Komponente mit dem Namen mypanel erstellt (alle Widgets in diesem Panel sind mit Pins verbunden, die mit mypanel beginnen). Da innerhalb des <led>-Tags kein <halpin>-Tag vorhanden war, benennt PyVCP den HAL-Pin für das LED-Widget automatisch mypanel.led.0
Für eine Liste der Widgets und ihrer Tags und Optionen, siehe nachfolgende Widget Übersicht.
Sobald Sie Ihr Panel erstellt haben, können Sie mit dem halcmd HAL-Signale mit den PyVCP-Pins verbinden:
net <signal-name> <pin-name> <opt-direction> <opt-pin-name>signal-name
Wenn Sie mit HAL noch nicht vertraut sind, ist das Kapitel HAL-Grundlagen im Integrator-Handbuch ein guter Ausgangspunkt.
3. Sicherheit
Parts of PyVCP files are evaluated as Python code, and can take any action available to Python programs. Only use PyVCP XML files from a source that you trust.
4. ACHSE
Since AXIS uses the same GUI toolkit (Tkinter) as PyVCP, it is possible to include a PyVCP panel at either the right side or the bottom of the AXIS user interface. It is not possible to display a panel in both of these positions simultaneously. A typical example is explained below.
In addition to or instead of displaying a PyVCP panel as described above, it is possible to display one or more PyVCP panels as embedded tabs in the AXIS GUI. This is achieved by the following in the [DISPLAY] section of the INI file:
EMBED_TAB_NAME    = Spindle
EMBED_TAB_COMMAND = pyvcp spindle.xml
The text label of the AXIS tab will display Spindle.
4.1. Beispiel-Panel
Place your PyVCP XML file describing the panel in the same directory where your INI file is. Say we we want to display the current spindle speed using a Bar widget. Place the following in a file called spindle.xml:
<pyvcp>
    <label>
       <text>"Spindeldrehzahl:"</text>
    </label>
   <bar>
        <halpin>"spindle-speed"</halpin>
        <max_>5000</max_>
    </bar>
</pyvcp>
Here we’ve made a panel with a Label and a Bar widget, specified that the HAL pin connected to the Bar should be named spindle-speed, and set the maximum value of the bar to 5000 (see widget reference below for all options). To make AXIS aware of this file, and call it at start up, we need to specify the following in the [DISPLAY] section of the INI file:
PYVCP = spindle.xml
If the panel should appear at the bottom of the AXIS user interface then we need to specify the following in the [DISPLAY] section of the INI file:
PYVCP_POSITION = BOTTOM
Alles andere als BOTTOM oder das Weglassen dieser Variable platziert das PyVCP-Panel auf der rechten Seite.
To make our widget actually display the spindle-speed it needs to be hooked up to the appropriate HAL signal. A HAL file that will be run once AXIS and PyVCP have started can be specified in the [HAL] section of the INI file:
POSTGUI_HALFILE = spindle_to_pyvcp.hal
This change will run the HAL commands specified in spindle_to_pyvcp.hal. In our example the contents could look like this:
net spindle-rpm-filtered => pyvcp.spindle-speed
unter der Annahme, dass ein Signal namens spindle-rpm-filtered bereits existiert. Beachten Sie, dass in Verbindung mit AXIS alle PyVCP-Panel-Widget-HAL-Pins Namen haben, die mit pyvcp. beginnen, alle PyVCP-Embedded-Tab-Widget-HAL-Pins beginnen mit dem als EMBED_TAB_NAME angegebenen Namen, der in Kleinbuchstaben umgewandelt wurde.
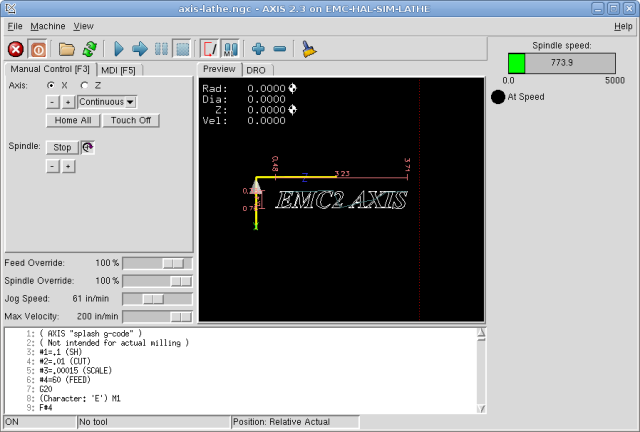
So sollte das neu erstellte PyVCP-Panel in AXIS aussehen. Die Konfiguration "sim/lathe" ist bereits auf diese Weise konfiguriert.
5. Eigenständig (engl. stand alone)
Dieser Abschnitt beschreibt, wie PyVCP-Panels mit oder ohne LinuxCNCs Maschinensteuerung angezeigt werden können.
Um ein eigenständiges PyVCP-Panel mit LinuxCNC zu laden, verwenden Sie diese Befehle:
loadusr -Wn mypanel pyvcp -g WxH+X+Y -c mypanel <path/>panel_file.xml
Sie würden dies verwenden, wenn Sie ein schwebendes Bedienfeld oder ein Bedienfeld mit einer anderen GUI als AXIS wünschen.
-
-Wn panelname - makes HAL wait for the component panelname to finish loading (become ready in HAL speak) before processing more HAL commands. This is important because PyVCP panels export HAL pins, and other HAL components will need them present to connect to them. Note the capital W and lowercase n. If you use the -Wn option you must use the -c option to name the panel.
-
pyvcp < -g> < -c> panel.xml - builds the panel with the optional geometry and/or panelname from the XML panel file. The panel.xml can be any name that ends in .xml. The .xml file is the file that describes how to build the panel. You must add the path name if the panel is not in the directory that the HAL script is in.
-
-g <WxH><+X+Y> - specifies the geometry to be used when constructing the panel. The syntax is Width x Height + X Anchor + Y Anchor. You can set the size or position or both. The anchor point is the upper left corner of the panel. An example is -g 250x500+800+0 This sets the panel at 250 pixels wide, 500 pixels tall, and anchors it at X800 Y0.
-
-c panelname - tells PyVCP what to call the component and also the title of the window. The panelname can be any name without spaces.
Um ein eigenständiges PyVCP-Panel ohne LinuxCNC zu laden, verwenden Sie diesen Befehl:
loadusr -Wn mypanel pyvcp -g 250x500+800+0 -c mypanel mypanel.xml
Der minimale Befehl zum Laden eines PyVCP-Panels lautet:
loadusr pyvcp mypanel.xml
Sie würden diese verwenden, wenn Sie ein Panel ohne LinuxCNC’s Maschine Controller wie für die Prüfung oder ein Standalone-DRO wollen.
The loadusr command is used when you also load a component that will stop HAL from closing until it’s done. If you loaded a panel and then loaded Classic Ladder using loadusr -w classicladder, CL would hold HAL open (and the panel) until you closed CL. The -Wn above means wait for the component -Wn "name" to become ready. (name can be any name. Note the capital W and lowercase n.) The -c tells PyVCP to build a panel with the name panelname using the info in panel_file_name.xml. The name panel_file_name.xml can be any name but must end in .xml - it is the file that describes how to build the panel. You must add the path name if the panel is not in the directory that the HAL script is in.
An optional command to use if you want the panel to stop HAL from continuing commands / shutting down. After loading any other components you want the last HAL command to be:
waitusr panelname
This tells HAL to wait for component panelname to close before continuing HAL commands. This is usually set as the last command so that HAL shuts down when the panel is closed.
6. Widgets
HAL signals come in two variants, bits and numbers. Bits are off/on signals. Numbers can be float, s32 or u32. For more information on HAL data types see the HAL Data section. The PyVCP widget can either display the value of the signal with an indicator widget, or modify the signal value with a control widget. Thus there are four classes of PyVCP widgets that you can connect to a HAL signal. A fifth class of helper widgets allow you to organize and label your panel.
-
Widgets zur Anzeige von "Bit"-Signalen:
led,rectled. -
Widgets zur Steuerung von Bit-Signalen:
button,checkbutton,radiobutton. -
Widgets zur Anzeige von numerischen Signalen: number, s32, u32, bar, meter.
-
Widgets zur Steuerung von numerischen Signalen:
spinbox,scale,jogwheel. -
Hilfs-Widgets:
hbox,vbox,table,label,labelframe.
6.1. Syntax
Each widget is described briefly, followed by the markup used, and a screen shot. All tags inside the main widget tag are optional.
6.2. Allgemeine Anmerkungen
At the present time, both a tag-based and an attribute-based syntax are supported. For instance, the following XML fragments are treated identically:
<led halpin="my-led"/>
und
<led><halpin>"my-led"</halpin></led>
Wenn die attributbasierte Syntax verwendet wird, werden die folgenden Regeln verwendet, um den Attributwert in einen Python-Wert zu verwandeln:
-
Wenn das erste Zeichen des Attributs eines der folgenden ist, wird es als Python-Ausdruck ausgewertet:
{(["'. -
Wird die Zeichenkette von int() akzeptiert, dann wird der Wert als Ganzzahl behandelt.
-
Bei Akzeptanz der Zeichenkette durch float() wird der Wert als Fließkommawert behandelt.
-
Andernfalls wird die Zeichenkette als Zeichenkette akzeptiert.
Bei Verwendung der Tag-basierten Syntax wird der Text innerhalb des Tags immer als Python-Ausdruck ausgewertet.
Die folgenden Beispiele zeigen eine Mischung aus verschiedenen Formaten.
Um einen Kommentar hinzuzufügen, verwenden Sie die XML-Syntax für einen Kommentar.
<!-- Mein Kommentar -->Edit the XML file with a text editor. In most cases you can right click on the file and select open with text editor or similar.
Colors can be specified using the X11 rgb colors by name gray75 or hex #0000ff. A complete list is located here https://sedition.com/perl/rgb.html.
Gebräuchliche Farben (Nummern bezeichnen Schattierungen der jeweiligen Farbe)
-
white (engl. für weiß)
-
black (engl. für schwarz)
-
blue (engl. für blau) und blue1 - 4
-
cyan und cyan1 - 4
-
green (engl. für grün) und green1 - 4
-
yellow (engl. für gelb) und yellow1 - 4
-
red (engl. für rot) und red1 - 4
-
purple (engl. für violett) und purple1 - 4
-
gray (amerikanisch für grau) und gray0 - 100
HAL-Pins bieten die Möglichkeit, das Widget mit etwas zu "verbinden". Sobald Sie einen HAL-Pin für Ihr Widget erstellt haben, können Sie ihn mit einem net-Befehl in einer .hal-Datei mit einem anderen HAL-Pin verbinden. Für weitere Informationen über den net-Befehl siehe den Abschnitt HAL Befehle.
6.3. Label
Ein Etikett ist eine Möglichkeit, Ihrem Panel Text hinzuzufügen.
-
<label></label> - erstellt ein Label.
-
<text>"text"</text> - der Text, der in das Etikett eingefügt werden soll; ein leeres Etikett kann als Abstandshalter verwendet werden, um andere Objekte auszurichten.
-
<font>("Helvetica",20)</font> - Schriftart und -größe des Textes angeben.
-
<relief>FLAT</relief> - Angabe des Rahmens um das Etikett (FLAT, RAISED, SUNKEN) Standard ist FLAT.
-
<bd>n</bd> - wobei n die Breite des Rahmens ist, wenn RAISED oder SUNKEN verwendet wird.
-
<padx>n</padx> - wobei n die Menge des zusätzlichen horizontalen Raums ist.
-
<pady>n</pady> - wobei n für die Anzahl der zusätzlichen vertikalen Leerzeichen steht.
Das Etikett hat einen optionalen Deaktivierungsstift, der erstellt wird, wenn Sie <disable_pin>True</disable_pin> hinzufügen.
<label>
    <text>"Dies ist ein Label:"</text>
    <font>("Helvetica",20)</font>
</label>
Der obige Code ergab dieses Beispiel:

6.4. Multi_Label
Eine Erweiterung der Textbeschriftung.
Wählbare Textbeschriftung, kann bis zu 6 Beschriftungslegenden anzeigen, wenn der zugehörige Bit-Pin aktiviert ist.
Verbinden Sie jeden Legenden-Pin mit einem Signal und erhalten Sie eine beschreibende Bezeichnung, wenn das Signal TRUE ist.
Wenn mehr als ein Legenden-Pin TRUE ist, wird die Legende mit der höchsten Nummer "TRUE" angezeigt.
Wenn ein Deaktivierungs-Pin mit <disable_pin>True</disable_pin> erstellt wird und dieser Pin auf true gesetzt wird, ändert sich die Beschriftung in einen ausgegrauten Zustand.
<multilabel>
    <legends>["Label1", "Label2", "Label3", "Label4", "Label5", "Label6"]</legends>
    <font>("Helvetica",20)</font>
    <disable_pin>True</disable_pin>
</multilabel>
Das obige Beispiel würde die folgenden Pins erzeugen.
pyvcp.multilabel.0.disable
pyvcp.multilabel.0.legend0
pyvcp.multilabel.0.legend1
pyvcp.multilabel.0.legend2
pyvcp.multilabel.0.legend3
pyvcp.multilabel.0.legend4
pyvcp.multilabel.0.legend5
Wenn Sie mehr als ein Multilabel haben, würden die erzeugten Pins die Nummer wie folgt erhöhen: pyvcp.multilabel.1.legend1.
6.5. LEDs
A LED is used to indicate the status of a bit halpin. The LED color will be on_color when the halpin is true, and off_color otherwise.
-
<led></led> - erzeugt eine runde LED
-
<rectled></rectled> - erzeugt eine rechteckige LED
-
<halpin>name</halpin> - Name des Pins, Standard ist led.n, wobei n eine ganze Zahl ist, die für jede LED inkrementiert wird.
-
<size>n</size> - n ist die Größe der LED in Pixeln, Standardwert ist 20.
-
<on_color>color</on_color> - sets the color of the LED to color when the pin is true. Default is green. See section on colors for more info.
-
<off_color>color</off_color> - sets the color of the LED to color when the pin is false. Default is red.
-
<height>n</height> - legt die Höhe der LED in Pixeln fest.
-
<width>n</width> - legt die Breite der LED in Pixeln fest.
-
<disable_pin>false</disable_pin> - bei true wird der LED ein Deaktivierungspin hinzugefügt.
-
<disabled_color>color</disabled_color> - setzt die Farbe der LED auf color, wenn der Pin deaktiviert ist.
<led>
    <halpin>"meine-LED"</halpin>
    <size>50</size>
    <on_color>"green"</on_color>
    <off_color>"red"</off_color>
</led>
Der obige Code ergab dieses Beispiel:

Dies ist eine Variante des "led" -Widgets.
<vbox>
    <relief>RIDGE</relief>
    <bd>6</bd>
    <rectled>
        <halpin>"meine-led"</halpin>
        <height>"50"</height>
        <width>"100"</width>
        <on_color>"green"</on_color>
        <off_color>"red"</off_color>
    </rectled>
</vbox>
Der obige Code erzeugt dieses Beispiel. Es zeigt auch einen vertikalen Kasten mit Relief.

6.6. Buttons
A button is used to control a BIT pin. The pin will be set True when the button is pressed and held down, and will be set False when the button is released. Buttons can use the following optional options.
-
<padx>n</padx> - wobei n die Menge des zusätzlichen horizontalen Raums ist.
-
<pady>n</pady> - wobei n für die Anzahl der zusätzlichen vertikalen Leerzeichen steht.
-
<activebackground>"color"</activebackground> - der Cursor über Farbe auf color gesetzt.
-
<fg>"color"</fg> - die Vordergrundfarbe wird auf color gesetzt.
-
<bg>"color"</bg> - die auf color gesetzte Hintergrundfarbe.
-
<disable_pin>True</disable_pin> - Pin deaktivieren.
A text button controls a bit halpin. The halpin is false until the button is pressed then it is true. The button is a momentary button.
Die Text Button hat einen optionalen Deaktivierungsstift, der beim Hinzufügen von <disable_pin>True</disable_pin> angelegt wird.
<button>
    <halpin>"ok-button"</halpin>
    <text>"OK"</text>
</button>
<button>
    <halpin>"abort-button"</halpin>
    <text>"Abort"</text>
</button>
Der obige Code ergab dieses Beispiel:

A checkbutton controls a bit halpin. The halpin will be set True when the button is checked, and false when the button is unchecked. The checkbutton is a toggle type button. The checkbuttons may be set initially as TRUE or FALSE the initval field A pin called changepin is also created automatically, which can toggle the Checkbutton via HAL, if the value linked is changed, to update the display remotely.


<checkbutton>
    <halpin>"coolant-chkbtn"</halpin>
    <text>"Coolant"</text>
    <initval>1</initval>
</checkbutton>
<checkbutton>
    <halpin>"chip-chkbtn"</halpin>
    <text>"Chips    "</text>
    <initval>0</initval>
</checkbutton>
Der obige Code ergab dieses Beispiel:

Das Kontrollkästchen für das Kühlmittel ist aktiviert.
Beachten Sie die zusätzlichen Leerzeichen im Text "Chips", um die Kontrollkästchen auszurichten.
A radiobutton will set one of the halpins true. The other pins are set false. The initval field may be set to choose the default selection when the panel displays. Only one radio button may be set to TRUE (1) or only the highest number pin set TRUE will have that value.
<radiobutton>
    <choices>["one","two","three"]</choices>
    <halpin>"my-radio"</halpin>
    <initval>0</initval>
</radiobutton>
Der obige Code ergab dieses Beispiel:

Note that the HAL pins in the example above will be named my-radio.one, my-radio.two, and my-radio.three. In the image above, one is the selected value. Use the tag <orient>HORIZONTAL</orient> to display horizontally.
6.7. Nummernanzeigen
Für die Anzeige von Zahlen stehen folgende Formatierungsoptionen zur Verfügung
-
<font>("Font Name",n)</font>wobei n die Schriftgröße ist. -
<width>_n_</width>, wobei n die Gesamtbreite des verwendeten Raums ist. -
<justify>_pos_</justify>, wobei pos LEFT, CENTER oder RIGHT ist (funktioniert nicht). -
<padx>__n__</padx>, wobei n die Menge des zusätzlichen horizontalen Raums ist. -
<pady>__n__</pady>, - wobei n für die Anzahl der zusätzlichen vertikalen Leerzeichen steht.
Das Zahlen-Widget zeigt den Wert eines Gleitkomma-Signals an.
<number>
    <halpin>"my-number"</halpin>
    <font>("Helvetica",24)</font>
    <format>"+4.4f"</format>
</number>
Der obige Code ergab dieses Beispiel:

-
<font> - is a Tkinter font type and size specification. One font that will show up to at least size 200 is courier 10 pitch, so for a really big Number widget you could specify:
<font>("courier 10 pitch",100)</font>
-
<format> - ist ein angegebenes Format im C-Stil, das bestimmt, wie die Zahl angezeigt wird.
The s32 number widget displays the value of a s32 number. The syntax is the same as number except the name which is <s32>. Make sure the width is wide enough to cover the largest number you expect to use.
<s32>
    <halpin>"my-number"</halpin>
    <font>("Helvetica",24)</font>
    <format>"6d"</format>
    <width>6</width>
</s32>
Der obige Code ergab dieses Beispiel:

The u32 number widget displays the value of a u32 number. The syntax is the same as number except the name which is <u32>.
A bar widget displays the value of a FLOAT signal both graphically using a bar display and numerically. The color of the bar can be set as one color throughout its range (default using fillcolor) or set to change color, dependent upon the value of the halpin (range1, range2 range3 must all be set, if you only want 2 ranges, set 2 of them to the same color).
-
<halpin>"my-bar"</halpin>text, setzt den Pin-Namen:pyvcp.my-bar. -
<min_>0</min_>Zahl, legt die minimale Skalierung fest. -
<max_>140</max_>(Zahl), legt die maximale Skalierung fest. -
<format>"3.1f"</format>(Text), setzt das Zahlenformat mit Python-Zahlenformatierung. -
<bgcolor>"grau"</bgcolor>(Text), legt die Hintergrundfarbe fest. -
<fillcolor>"rot"</fillcolor>(Text), setzt die Füllfarbe. -
<range1>0,100, "grün"</range1>(Zahl, Zahl, Text), legt den ersten Bereich und die Farbe fest. -
<range2>101,135, "orange"</range2>(number, number, text), legt den ersten Bereich und die Farbe fest. -
<range3>136, 150, "rot"</range3> Zahl, Zahl, Text, legt den ersten Bereich und die Farbe fest.
-
<canvas_width>200</canvas_width>, (Zahl), legt die Gesamtbreite fest. -
<canvas_height>50</canvas_height>(Zahl), legt die Gesamthöhe fest. -
<bar_height>30</bar_height>(Zahl), legt die Balkenhöhe fest, muss kleiner sein als canvas_height. -
<bar_width>150</bar_width>(Zahl), setzt die Balkenbreite, muss kleiner als canvas_width sein.
<bar>
    <halpin>"my-bar"</halpin>
    <min_>0</min_>
    <max_>123</max_>
    <format>"3.1f"</format>
    <bgcolor>"grey"</bgcolor>
    <fillcolor>"red"</fillcolor>
    <range1>0,100,"green"</range1>
    <range2>101,135,"orange"</range2>
    <range3>136, 150,"red"</range3>
    <canvas_width>200</canvas_width>
    <canvas_height>50</canvas_height>
    <bar_height>30</bar_height>
    <bar_width>150</bar_width>
</bar>
Der obige Code ergab dieses Beispiel:

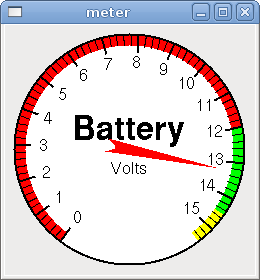
Das Messgerät zeigt den Wert eines FLOAT-Signals mit einer herkömmlichen Messuhr an.
<meter>
    <halpin>"mymeter"</halpin>
    <text>"Battery"</text>
    <subtext>"Volts"</subtext>
    <size>250</size>
    <min_>0</min_>
    <max_>15.5</max_>
    <majorscale>1</majorscale>
    <minorscale>0.2</minorscale>
    <region1>(14.5,15.5,"yellow")</region1>
    <region2>(12,14.5,"green")</region2>
    <region3>(0,12,"red")</region3>
</meter>
Der obige Code ergab dieses Beispiel:
6.8. Numerische Eingaben
A spinbox controls a FLOAT pin. You increase or decrease the value of the pin by either pressing on the arrows, or pointing at the spinbox and rolling your mouse-wheel. If the param_pin field is set TRUE(1), a pin will be created that can be used to set the spinbox to an initial value and to remotely alter its value without HID input.
<spinbox>
    <halpin>"my-spinbox"</halpin>
    <min_>-12</min_>
    <max_>33</max_>
    <initval>0</initval>
    <resolution>0.1</resolution>
    <format>"2.3f"</format>
    <font>("Arial",30)</font>
    <param_pin>1</param_pin>
</spinbox>
Der obige Code ergab dieses Beispiel:

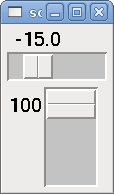
A scale controls a float or a s32 pin. You increase or decrease the value of the pin be either dragging the slider, or pointing at the scale and rolling your mouse-wheel. The halpin will have both -f and -i added to it to form the float and s32 pins. Width is the width of the slider in vertical and the height of the slider in horizontal orientation. If the param_pin field is set TRUE(1), a pin will be created that can be used to set the spinbox to an initial value and to remotely alter its value without HID input.
<scale>
    <font>("Helvetica",16)</font>
    <width>"25"</width>
    <halpin>"my-hscale"</halpin>
    <resolution>0.1</resolution>
    <orient>HORIZONTAL</orient>
    <initval>-15</initval>
    <min_>-33</min_>
    <max_>26</max_>
    <param_pin>1</param_pin>
</scale>
<scale>
    <font>("Helvetica",16)</font>
    <width>"50"</width>
    <halpin>"my-vscale"</halpin>
    <resolution>1</resolution>
    <orient>VERTICAL</orient>
    <min_>100</min_>
    <max_>0</max_>
    <param_pin>1</param_pin>
</scale>
Der obige Code ergab dieses Beispiel:
|
Anmerkung
|
Beachten Sie, dass standardmäßig "min" angezeigt wird, auch wenn es größer als "max" ist, es sei denn, "min" ist negativ. |
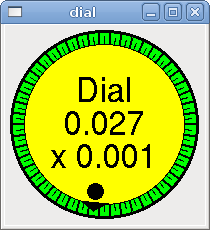
The Dial outputs a HAL float and reacts to both mouse wheel and dragging. Double left click to increase the resolution and double right click to reduce the resolution by one digit. The output is capped by the min and max values. The <cpr> is how many tick marks are on the outside of the ring (beware of high numbers). If the param_pin field is set TRUE(1), a pin will be created that can be used to set the spinbox to an initial value and to remotely alter its value without HID input.
<dial>
    <size>200</size>
    <cpr>100</cpr>
    <min_>-15</min_>
    <max_>15</max_>
    <text>"Dial"</text>
    <initval>0</initval>
    <resolution>0.001</resolution>
    <halpin>"anaout"</halpin>
    <dialcolor>"yellow"</dialcolor>
    <edgecolor>"green"</edgecolor>
    <dotcolor>"black"</dotcolor>
    <param_pin>1</param_pin>
</dial>
Der obige Code ergab dieses Beispiel:
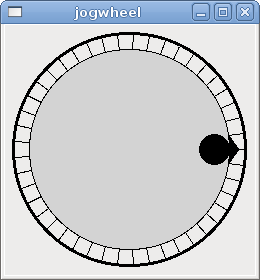
Jogwheel ahmt ein echtes Jogwheel nach, indem es einen FLOAT-Pin ausgibt, der auf- oder abwärts zählt, wenn das Rad gedreht wird, entweder durch Ziehen in einer kreisförmigen Bewegung oder durch Drehen des Mausrads.
Optionale Tags:
* <text>"Mein Text"</text> zeigt Text an
* <bgcolor>"grey"</bgcolor> <fillcolor>"green"</fillcolor> Hintergrund- und aktive Farben
* <scale_pin>1</scale_pin> creates scale text and a FLOAT.scale pin to display jog scale
* <clear_pin>1</clear_pin> creates DRO and a BIT.reset pin to reset DRO. Needs scale_pin for scaled DRO. Shift+click resets DRO also
<jogwheel>
    <halpin>"my-wheel"</halpin>
    <cpr>45</cpr>
    <size>250</size>
</jogwheel>
Der obige Code ergab dieses Beispiel:
6.9. Bilder
Image displays use only .gif image format. All of the images must be the same size. The images must be in the same directory as your INI file (or in the current directory if running from the command line with halrun/halcmd).
Das image_bit schaltet zwischen zwei Bildern um, indem es den halpin auf true oder false setzt.
<image name='fwd' file='fwd.gif'/>
<image name='rev' file='rev.gif'/>
<vbox>
    <image_bit halpin='selectimage' images='fwd rev'/>
</vbox>
Dieses Beispiel wurde mit dem obigen Code erstellt. Es verwendet die beiden Bilddateien fwd.gif und rev.gif. FWD wird angezeigt, wenn "selectimage" falsch ist, und REV wird angezeigt, wenn "selectimage" wahr ist.


The image_u32 is the same as image_bit, except you have essentially an unlimited number of images and you select the image by setting the halpin to a integer value with 0 for the first image in the images list and 1 for the second image, etc.
<image name='stb' file='stb.gif'/>
<image name='fwd' file='fwd.gif'/>
<image name='rev' file='rev.gif'/>
<vbox>
    <image_u32 halpin='selectimage' images='stb fwd rev'/>
</vbox>
Der obige Code erzeugt das folgende Beispiel, indem das Bild stb.gif hinzugefügt wird.


Beachten Sie, dass der Standardwert der Minimalwert ist, auch wenn er höher als der Maximalwert ist, es sei denn, es gibt einen negativen Minimalwert.
6.10. Containers (engl. für Behälter)
Containers are widgets that contain other widgets. Containers are used to group other widgets.
Container borders are specified with two tags used together. The <relief> tag specifies the type of border and the <bd> specifies the width of the border.
- <relief>_Typ_</relief>
-
Wobei Typ FLAT, SUNKEN, RAISED, GROOVE, oder RIDGE ist.
- <bd>_n_</bd>
-
Dabei ist n die Breite des Rahmens.
<hbox>
    <button>
        <relief>FLAT</relief>
        <text>"FLAT"</text>
        <bd>3</bd>
    </button>
    <button>
        <relief>SUNKEN</relief>
        <text>"SUNKEN"</text>
        <bd>3</bd>
    </button>
    <button>
        <relief>RAISED</relief>
        <text>"RAISED"</text>
        <bd>3</bd>
    </button>
    <button>
        <relief>GROOVE</relief>
        <text>"GROOVE"</text>
        <bd>3</bd>
    </button>
    <button>
        <relief>RIDGE</relief>
        <text>"RIDGE"</text>
        <bd>3</bd>
    </button>
</hbox>
Der obige Code ergab dieses Beispiel:

Container fill are specified with the <boxfill fill=""/> tag. Valid entries are none, x, y and both. The x fill is a horizontal fill and the y fill is a vertical fill
-
<boxfill fill ="style"/> -
Dabei ist style none, x, y oder beides. Standardwert ist x für Vbox und y für Hbox.
Container anchors are specified with the <boxanchor anchor=""/> tag. The anchor specifies where to position each slave in its parcel. Valid entries are center, n, s, e, w, for center, north, south, east and west. Combinations like sw, se, nw and ne are also valid.
-
<boxanchor anchor="position"/> -
Dabei ist Position center, n, s, e, w, ne, nw, se oder sw. Standardwert ist Mitte.
Container expand is specified with the boolean <boxexpand expand=""/> tag. Valid entries are "yes", "no".
-
<boxexpand expand="boolean"/> -
Where boolean is either "yes" or "no". Default is yes.
Verwenden Sie eine Hbox, wenn Sie Widgets horizontal nebeneinander stapeln möchten.
<hbox>
    <relief>RIDGE</relief>
    <bd>6</bd>
    <label><text>"a hbox:"</text></label>
    <led></led>
    <number></number>
    <bar></bar>
</hbox>
Der obige Code ergab dieses Beispiel:

Inside an Hbox, you can use the <boxfill fill=""/>, <boxanchor anchor=""/>, and <boxexpand expand=""/> tags to choose how items in the box behave when the window is re-sized. The default is fill="y", anchor="center", expand="yes" for an Hbox.
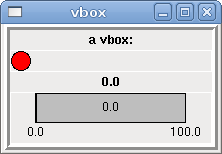
Verwenden Sie eine Vbox, wenn Sie Widgets vertikal übereinander stapeln möchten.
<vbox>
    <relief>RIDGE</relief>
    <bd>6</bd>
    <label><text>"eine vbox:"</text></label>
    <led></led>
    <number></number>
    <bar></bar>
</vbox>
Der obige Code ergab dieses Beispiel:
Inside a Vbox, you can use the <boxfill fill=""/>, <boxanchor anchor=""/>, and <boxexpand expand=""/> tags to choose how items in the box behave when the window is re-sized. The default is fill="x", anchor="center", expand="yes" for a Vbox.
Ein Etikettenrahmen (engl. labelframe) ist ein Rahmen mit einer Rille und einem Etikett in der oberen linken Ecke.
<labelframe text="Label: Leds groupées"><labelframe text="Group Title"> <font>("Helvetica",16)</font> <hbox> <led/> <led/> </hbox> </labelframe>
Der obige Code ergab dieses Beispiel:

A table is a container that allows layout in a grid of rows and columns. Each row is started by a <tablerow/> tag. A contained widget may span rows or columns through the use of the <tablespan rows= cols=/> tag. The sides of the cells to which the contained widgets "stick" may be set through the use of the <tablesticky sticky=/> tag. A table expands on its flexible rows and columns.
<table flexible_rows="[2]" flexible_columns="[1,4]">
<tablesticky sticky="new"/>
<tablerow/>
    <label>
        <text>" A (cell 1,1) "</text>
        <relief>RIDGE</relief>
        <bd>3</bd>
    </label>
    <label text="B (cell 1,2)"/>
    <tablespan columns="2"/>
    <label text="C, D (cells 1,3 and 1,4)"/>
<tablerow/>
    <label text="E (cell 2,1)"/>
    <tablesticky sticky="nsew"/>
    <tablespan rows="2"/>
    <label text="'spans\n2 rows'"/>
    <tablesticky sticky="new"/>
    <label text="G (cell 2,3)"/>
    <label text="H (cell 2,4)"/>
<tablerow/>
    <label text="J (cell 3,1)"/>
    <label text="K (cell 3,2)"/>
    <u32 halpin="test"/>
</table>
Der obige Code ergab dieses Beispiel:

Eine Benutzeroberfläche mit Registerkarten kann ziemlich viel Platz sparen.
<tabs>
    <names> ["spindle","green eggs"]</names>
</tabs>
<tabs>
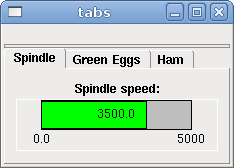
    <names>["Spindle", "Green Eggs", "Ham"]</names>
    <vbox>
        <label>
            <text>"Spindle speed:"</text>
        </label>
        <bar>
            <halpin>"spindle-speed"</halpin>
            <max_>5000</max_>
        </bar>
    </vbox>
    <vbox>
        <label>
            <text>"(this is the green eggs tab)"</text>
        </label>
    </vbox>
    <vbox>
        <label>
            <text>"(this tab has nothing on it)"</text>
        </label>
    </vbox>
</tabs>
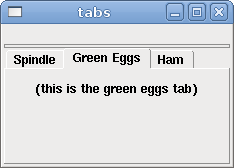
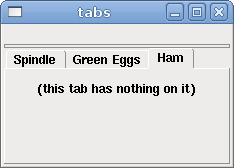
Der obige Code ergibt dieses Beispiel, in dem jede ausgewählte Registerkarte angezeigt wird.
