Qtscreen uses QtVCP widgets for LinuxCNC integration.
Widget is the general name for the UI objects such as buttons and labels in PyQt.
Es stehen Ihnen alle Standard-Widgets im Qt Designer Editor zur Verfügung.
There are also special widgets made for LinuxCNC that make integration easier. These are split in two, heading on the right side of the editor:
-
Einer ist für nur HAL-Widgets.
-
Das andere ist für CNC-Steuerungs-Widgets.
You are free to mix them in any way on your panel.
|
Anmerkung
|
Diese Beschreibung der Widget-Eigenschaften kann aufgrund der weiteren Entwicklung und des Mangels an Personen, die Dokumentationen schreiben, leicht veraltet sein (eine gute Möglichkeit, dem Projekt etwas zurückzugeben). Die endgültigen Beschreibungen finden Sie im Quellcode. |
1. Nur HAL-Widgets
Diese Widgets haben normalerweise HAL-Pins und reagieren nicht auf die Maschinensteuerung.
1.1. XEmbed - Widget zum Einbetten von Programmen
Ermöglicht die Einbettung eines Programms in das Widget.
Es funktionieren nur Programme, die das xembed-Protokoll verwenden, wie z.B.:
-
GladeVCP Virtuelle Control Panels
-
Integrierte virtuelle Tastatur
-
QtVCP virtual control panels
-
mplayer-Videoplayer
1.2. Slider - HAL-Pin-Wert-Anpassungs-Widget
Allows one to adjust a HAL pin value using a sliding pointer.
1.3. LED - Indicator Widget

LED: LED-Anzeige-WidgetA LED like indicator that optionally follows a HAL pin’s logic.
-
halpin_option -
Wählt aus, ob die LED einem Eingangs-HAL-Pin oder einem Programmzustand folgt.
-
diameter -
Diameter of the LED
-
color -
Color of the LED when on.
-
off_color -
Color of the LED when off.
-
alignment -
Qt-Hinweis zur Ausrichtung.
-
state -
Current state of LED
-
flashing -
Schaltet die Blinkoption ein und aus.
-
flashRate -
Sets the flash rate.
The LED properties can be defined in a stylesheet with the following code added to the .qss file, name_of_led being the widget name defined in Qt Designer’s editor:
LED #name_0f_led{
  qproperty-color: red;
  qproperty-diameter: 20;
  qproperty-flashRate: 150;
}
1.4. CheckBox Widget
This widget allows the user to check a box to set a HAL pin true or false.
Er basiert auf dem QCheckButton von PyQt.
1.5. RadioButton Widget
This widget allows a user to set HAL pins true or false. Only one RadioButton widget of a group can be true at a time.
It is based on PyQt’s QRadioButton.
1.6. Gauge - Rundes Messuhr-Widget
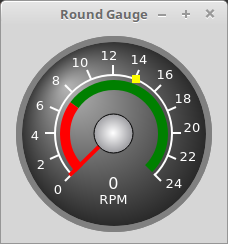
Gauge: Round Dial Gauge WidgetRound Gauge kann in einem LinuxCNC GUI verwendet werden, um einen Eingabeparameter auf dem Zifferblatt anzuzeigen.
Es gibt mehrere Eigenschaften, die vom Benutzer eingestellt werden können, um das Erscheinungsbild der Anzeige anzupassen.
Die folgenden Parameter können entweder programmatisch oder über den Eigenschaftseditor von Qt Designer eingestellt werden.
-
halpin_option -
Wenn Sie diese Option auf
Truesetzen, werden 2 HAL-Pins erstellt:-
One is for setting the
valueinput -
The other is for setting the
setpoint.
If this option is not set, then
valueandsetpointmust be connected programmatically, i.e., in the handler file. -
-
max_reading -
This value determines the highest number displayed on the gauge face.
-
max_value -
Dies ist der maximal zu erwartende Wert des Werteingangssignals.
Mit anderen Worten, es ist der Skalenendwert. -
num_ticks -
Dies ist die Anzahl der Ticks/Anzeigewerte auf der Anzeigefläche.
Sie sollte auf eine Zahl eingestellt werden, die sicherstellt, dass die Textanzeigen auf der Anzeigefläche lesbar sind.
Der minimal zulässige Wert ist 2. -
zone1_color -
Zone1 erstreckt sich vom maximalen Messwert bis zum Schwellenwert.
Sie kann auf eine beliebige RGB-Farbe eingestellt werden. -
zone2_color -
Zone2 erstreckt sich vom Schwellenwert bis zum Mindestwert, der 0 ist.
Sie kann auf eine beliebige RGB-Farbe eingestellt werden. -
bezel_color -
This is the color of the outer ring of the gauge.
-
threshold -
Der Schwellenwert ist der Übergangspunkt zwischen den Zonen.
Er sollte auf einen Wert zwischen 0 und dem Maximalwert gesetzt werden.
Der höchstzulässige Wert wird auf den "Maximalwert" des Messgeräts gesetzt, der Mindestwert ist 0. -
gauge_label -
Dies ist der Text unter der Wertanzeige, nahe dem unteren Rand des Messgeräts.
Die Funktion des Messgeräts ist dann leicht erkennbar.
There are 2 inputs that are not customizable. They can be set via HAL pins, programmatically or via signals from other widgets:
-
value -
Dies ist der eigentliche Eingangswert, der mit der Nadel des Messgeräts und in der digitalen Anzeige angezeigt wird.
Er muss auf einen Wert zwischen 0 und dem Maximalwert eingestellt werden. -
setpoint -
This is a value that determines the location of a small marker on the gauge face. It must be set to a value between 0 and the maximum value.
1.7. HalBar - HAL Bar Level Indicator
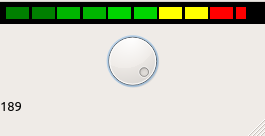
HalBar: Panel demonstrating the HAL Bar Level IndicatorThis widget is used to indicate level or value, usually of a HAL s32/float pin.
you can also disable the HAL pin and use Qt signals or python commands to change the level.
1.7.1. Bar Properties:
HalBar is a subclass of the Bar widget, so it inherits these properties
-
stepColorList: a list of color strings, the number of colors defines the number of bars.
-
backgroundColor: a QColor definition of the background color.
-
setMaximum: an integer that defines the maximum level of indication.
-
setMinimum: an integer that defines the lowest level of indication.
1.7.2. halBar Properties:
-
pinType: to select HAL pins type:
-
NONEno HAL pin will be added -
S32A S32 integer pin will be added -
FLOATA Float pin will be added
-
-
pinName: to change the HAL pin name otherwise the widget base name is used.
1.7.3. HalBar style sheets
The above Bar properties could be set in styles sheets.
pinType and pinName properties can not be changed in stylesheets.
|
Anmerkung
|
In style sheets, stepColorList is a single string of color names separated by commas. |
HalBar{
    qproperty-backgroundColor: #000;
    qproperty-stepColorList: 'green,green,#00b600,#00b600,#00d600,#00d600,yellow,yellow,red,red';
}
1.8. HALPad - HAL Buttons Joypad
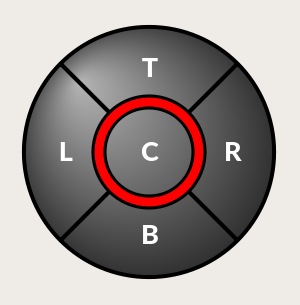
HALPad: HAL Buttons JoypadDieses Widget sieht aus und funktioniert wie ein 5-Tasten-D-Pad, mit einem LED-Ring.
Jede Taste hat einen wählbaren Typ (Bit, S32 oder Float) als HAL-Pin.
The LED center ring has selectable colors for off and on and is controlled by a bit HAL pin.
HALPad ENUMSEs werden numerierte Konstanten verwendet:
-
Um Indikatorpositionen zu referenzieren:
-
NONE -
LEFT -
RIGHT -
CENTER -
TOP -
BOTTOM -
LEFTRIGHT -
TOPBOTTOM
-
-
Für HAL-Pins Typ:
-
NONE -
BIT -
S32 -
FLOAT
-
Sie verwenden den Namen des Widgets im Qt Designer plus die Referenzkonstante:
self.w.halpadname.set_highlight(self.w.halpadname.LEFTRIGHT)
HALPad Properties-
pin_name -
Optional name to use for the HAL pins basename. If left blank, the Qt Designer widget name will be used.
-
pin_type -
Select the HAL output pin type. This property is only used at startup. Selection can be set in Qt Designer:
-
NONE -
BIT -
S32 -
FLOAT
-
-
left_image_path -
right_image_path -
center_image_path -
top_image_path -
bottom_image_path -
File or resource path to an image to display in the described button location.
If the reset button is pressed in the Qt Designer editor property, the image will not be displayed (allowing optional text). -
left_text -
right_text -
center_text -
top_text -
bottom_text -
A text string to be displayed in the described button location.
If left blank an image can be designated to be displayed. -
true_color -
false_color -
Farbauswahl für den mittleren LED-Ring, der angezeigt werden soll, wenn der
BASENAME.light.centerHAL-PinTrueoderFalseist. -
text_color -
Auswahl der Farbe für den Text des Buttons.
-
text_font -
Auswahl der Schriftart für den Text des Buttons.
HALPad StylesThe above properties could be set in styles sheets.
HALPad{
    qproperty-on_color: #000;
    qproperty-off_color: #444;
}
1.9. PushButton - HAL Pin Toggle Widget
Mit diesem Widget kann der Benutzer einen HAL-Pin per Tastendruck auf "true" oder "false" setzen.
As an option it can be a toggle button.
For a LED Indicator Option, see [sub:qtvcp:widgets:indicatedpushbutton][IndicatedPushButton] below for more info.
Es gibt auch andere Optionen.
It is based on PyQt’s QPushButton.
1.10. focusOverlay - Focus Overlay Widget
Dieses Widget legt ein farbiges Overlay über den Bildschirm, normalerweise während ein Dialog angezeigt wird.
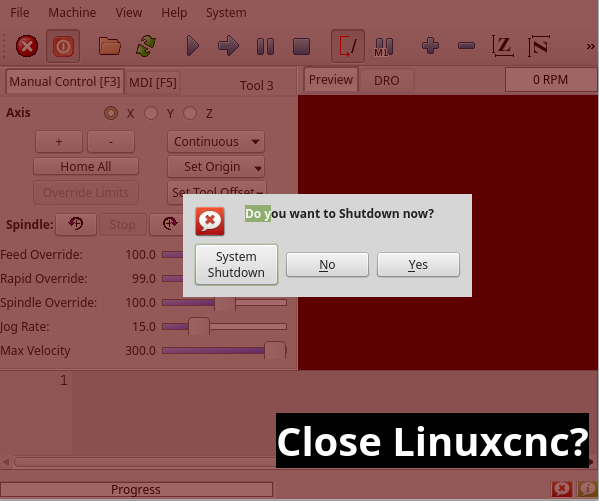
Wird verwendet, um ein "konzentriertes" Gefühl zu erzeugen und die Aufmerksamkeit auf wichtige Informationen zu lenken.
Es kann auch ein durchsichtiges Bild anzeigen.
Es kann auch Nachrichtentext und Schaltflächen anzeigen.
Dieses Widget kann mit ‚STATUS‘-Meldungen gesteuert werden.
1.11. gridLayout - Grid Layout Widget
This widget controls if the widgets inside it are enabled or disabled.
Disabled widgets typically have a different color and do not respond to actions.
It is based on PyQt’s QGridLayout.
1.12. hal_label - HAL Label Widget
This widget displays values sent to it.
Werte können gesendet werden von:
-
HAL-Pins
Der Eingangsstift kann als Bit, S32, Float oder kein Stift ausgewählt werden -
Programmatically
-
A
QtSignal
Es gibt eine "textTemplate"-Eigenschaft, um den Rich-Text einzustellen und/oder den Text zu formatieren.
Eine grundlegende Formatierung könnte sein:
-
%rfür Boolesche Werte -
%dfor integers -
%0.4ffür Floats.
A rich text example might be:
self.w.my_hal_label.setProperty(textTemplate,"""
<html>
<head/>
<body>
  <p><span style="font-size:12pt;font-weight:600;color:#f40c11;">%0.4f</span></p>
</body>
</html>
"""
)
The setDisplay slot can be connected to an integer, a float or a bool signal.
If the property pin_name is not set the widget name will be used.
Es gibt Funktionsaufrufe zur Anzeige von Werten:
-
[HALLabelName].setDisplay(some_value) -
Can be used to set the display if no HAL pin is selected.
-
[HALLabelName].setProperty(textTemplate,"%d") -
Sets the template of the display.
Es basiert auf PyQts QLabel.
1.13. LCDNumber - Widget zum Auslesen der LCD-Stilnummer
Dieses Widget zeigt HAL-Float/S32/Bit-Werte in einer LCD-ähnlichen Form an.
Es kann Zahlen im Dezimal-, Hexadezimal-, Binär- und Oktalformat anzeigen, indem es die Eigenschaft Modus setzt.
When using floats you can set a formatting string.
You must set the digitCount property to an appropriate setting to display the largest number.
-
pin_name -
Optionsstring, der als HAL-Pin-Name verwendet werden soll.
Bei einem leeren String wird der Name des Widgets verwendet. -
bit_pin_type -
Selects the input pin as type BIT.
-
s32_pin_type -
Selects the input pin as type S32.
-
float_pin_type -
Select the input pin as type
FLOAT. -
floatTemplate -
A string that will be used as a Python3 format template to tailor the LCD display.
Only used when aFLOATpin is selected, e.g.,{:.2f}will display a float rounded to 2 numbers after the decimal.
A blank setting will allow the decimal to move as required.
Es basiert auf PyQts QLCDNumber.
1.14. DoubleScale - Spin Button Entry Widget
This widget is a spin button entry widget used for setting a s32 and float HAL pin.
It has an internal scale factor, set to a default of 1, that can be set programmatically or using a QtSignal.
The setInput slot can be connected to an integer, or a float signal.
-
[HALLabelName].setInput(some_value) -
This is a function call to change the internal scaling factor.
The HAL pins will be set to the value of the internal scale times the widget displayed value.
1.15. GeneralHALInput - General Signals/Slots Input Connection Widget
This widget is used to connect an arbitrary Qt widget to HAL using signals/slots.
It is used for widgets that should respond to HAL pin changes.
1.16. GeneralHALOutput - General Signals/Slots Output Connection Widget
This widget is used to connect an arbitrary Qt widget to HAL using signals/slots.
It is used for widgets that should control HAL pins.
1.17. WidgetSwitcher - Multi-widget Layout View Switcher Widget
This is used to switch the view of a multi-widget layout to show just one widget, i.e. to flip between a large view of a widget and a smaller multi widget view.
It is different from a stacked widget as it can pull a widget from anywhere in the screen and place it in its page with a different layout than it originally had.
The original widget must be in a layout for switcher to put it back.
In Qt Designer you will:
-
Add the
WidgetSwitcherwidget on screen. -
Right click the
WidgetSwitcherand add a page. -
Populate it with the widgets/layouts you wish to see in a default form.
-
Add as many pages as there are views to switch to.
-
On each page, add a layout widget.
After adding the layout you must right click the widget switcher again and set the layout option. -
Click on the
WidgetSwitcherwidget and then scroll to the bottom of the property editor. -
Look for the dynamic property
widget_listand double click to the right of it. -
A dialog pops up allowing you to add the names of the widgets to move to the pages you added to the
WidgetSwitcher.
There are function calls to display specific widgets.
By calling one of these functions, you control what widget is currently displayed:
-
[_WidgetSwitcherName_].show_id_widget(_number_) -
[_WidgetSwitcherName_].show_named_widget(_widget_name_) -
[_WidgetSwitcherName_].show_default() -
Dies zeigt das "Seite 0"-Layout und stellt alle anderen Widgets wieder so ein, wie sie ursprünglich in Qt Designer erstellt wurden.
-
[_WidgetSwitcherName_].show_next() -
Nächstes Widget anzeigen.
Es basiert auf dem QStack-Widget.
2. Widgets für Maschinensteuerungen
Diese Widgets interagieren mit dem Zustand der Maschinensteuerung.
2.1. ActionButton - Aktionssteuerungs-Widget der Maschinensteuerung
Diese Tasten werden für Steuerungsaktionen an der Maschinensteuerung verwendet.
Sie sind auf IndicatedPushButton aufgebaut und können daher mit LEDs überlagert werden.
|
Anmerkung
|
If you left double click on this widget you can launch a dialog to set any of these actions. The dialogs will help to set the right related data to the selected action. You can also change these properties directly in the property editor. |
You can select one of these:
-
Estop -
Machine On -
Auto -
mdi -
manual -
run -
run_from_line status -
Gets line number from
STATUSmessagegcode-line-selected. -
run_from_line slot -
Gets line number from Qt Designer int/str slot
setRunFromLine. -
abort -
pause -
load dialog -
Requires a dialog widget present.
-
Camview dialog -
Requires
camviewdialog widget present. -
origin offset dialog -
Requires origin offset dialog widget present.
-
macro dialog -
Requires macro dialog widget present.
-
Launch Halmeter -
Launch Status -
Launch Halshow -
Home -
Set the joint number to -1 for
all-home. -
Unhome -
Set the joint number to -1 for
all-unhome. -
Home Selected -
Homes the joint/axis selected by
STATUS. -
Unhome Selected -
Unhomes the joint/axis selected by
STATUS. -
zero axis -
zero G5X -
Nullt die aktuellen Offsets des Benutzerkoordinatensystems.
-
zero G92 -
Nullt die optionalen
G92-Offsets. -
zero Z rotational -
Zeros the rotation offset.
-
jog joint positive -
Legt die Gelenknummer fest.
-
jog joint negative -
Legt die Gelenknummer fest.
-
jog selected positive -
Ausgewählt mit einem anderen Widget oder
STATUS. -
jog selected negative -
Ausgewählt mit einem anderen Widget oder
STATUS. -
jog increment -
Set metric/imperial/angular numbers.
-
jog rate -
Festlegen Sie die float/alt-Gleitkommanummer.
-
feed override -
Festlegen Sie die float/alt-Gleitkommanummer.
-
rapid override -
Festlegen Sie die float/alt-Gleitkommanummer.
-
spindle override -
Festlegen Sie die float/alt-Gleitkommanummer.
-
spindle fwd -
spindle backward -
spindle stop -
spindle up -
spindle down -
view change -
Set
view_type_string. -
limits override -
flood -
mist -
block delete -
optional stop -
mdi command -
Set
command_string, i.e.,calls a hard coded MDI command -
INI mdi number -
Set
ini_mdi_number, i.e., calls an INI based MDI command -
dro absolute -
dro relative -
dro dtg -
exit screen -
Closes down LinuxCNC
-
Override limits -
Temporarily override hard limits
-
launch dialogs -
Pops up dialogs if they are included in ui file.
-
set DRO to relative -
set DRO to absolute -
set DRO to distance-to-go -
Diese setzen Attribute der ausgewählten Aktion (Verfügbarkeit hängt vom Widget ab):
-
toggle float option -
Allows jog rate and overrides to toggle between two rates.
-
joint number -
Wählt das Gelenk/die Achse aus, das/die von der Schaltfläche gesteuert wird.
-
incr imperial number -
Legt das imperiale Jog-Inkrement fest (negativ setzen, um zu ignorieren).
-
incr mm number -
Legt die metrische Schrittweite fest (zum Ignorieren negativ setzen).
-
incr angular number -
Legt die Winkelschrittweite fest (zum Ignorieren negativ einstellen).
-
float number -
Wird für
jograteund overrides verwendet. -
float alternate number -
Für
jograteund overrides, die zwischen zwei Fließkommazahlen wechseln können. -
view type string -
Can be:
-
p, -
x,y,y2,z,z2, -
zoom-in,zoom-out, -
pan-up,pan-down,pan-left,pan-right, -
rotate-up,rotate-down,rotate-cw,rotate-ccw -
clear.
-
-
command string -
MDI command string that will be invoked if the MDI command action is selected.
-
ini_mdi_number -
Ein Verweis auf den Abschnitt
[MDI_COMMAND_LIST]der _INI-Datei.
Setzen Sie einen Integer, der eine Zeile unter der INI-Zeile[MDI_COMMAND]auswählt, beginnend bei 0.
Fügen Sie dann in der INI-Datei unter der Überschrift[MDI_COMMAND_LIST]entsprechende Zeilen hinzu.
Die Befehle werden durch das;getrennt.
DasLabelwird nach dem Komma gesetzt, und das Symbol\nfügt einen Zeilenumbruch hinzu.
[MDI_COMMAND_LIST]
MDI_COMMAND = G0 Z25;X0 Y0;Z0, Goto\nUser\nZero
MDI_COMMAND = G53 G0 Z0;G53 G0 X0 Y0, Goto\nMachn\nZero
Action buttons are subclassed from [sub:qtvcp:widgets:indicatedpushbutton][IndicatedPushButton]. See the following sections for more information about:
2.2. ActionToolButton - Optional Actions Menu Button Widget
ActionToolButton buttons are similar in concept to action buttons, but they use QToolButtons to allow for optional actions to be selected by pushing and holding the button till the option menu pops up.
Currently there is only one option: userView.
Es basiert auf PyQts QToolButton.
userView Record and Set User View WidgetUser View tool button allows to record and return to an arbitrary graphics view.
Press and hold the button to have the menu pop up and press record view to record the currently displayed graphics view.
Click the button normally to return to the last recorded position.
Die aufgezeichnete Position wird beim Herunterfahren gespeichert, wenn eine Einstellungsdateioption eingerichtet ist.
|
Anmerkung
|
Due to programming limitations, the recorded position may not show exactly the same. Particularly, if you pan zoomed out and pan zoomed in again while setting the desired view. Best practice is to select a main view, modify as desired, record, then immediately click the button to switch to the recorded position. If it is not as you like, modify its existing position and re-record. |
2.3. RoundButton - Round Shapped ActionButton Widget
Round buttons work the same as ActionButtons other than the button is cropped round.
They are intended only to be visually different.
They have two path properties for displaying images on true and false.
2.4. AxisToolButton - Select and Set Axis Widget
This allows one to select and set an axis.
If the button is set checkable, it will indicate which axis is selected.
If you press and hold the button a pop up menu will show allowing one to:
-
Nullen der Achse
-
Divide the axis by 2
-
Set the axis arbitrarily
-
Reset the axis to the last number recorded
You must have selected an entry dialog that corresponds to the dialog_code_string, usually this is selected from the screenOptions widget.
You can select the property halpin_option, it will then set a HAL pin true when the axis is selected. The property joint_number should be set to the appropriate joint number. The property axis_letter should be set to the appropriate axis letter.
The property dialog_code_string can be changed to ENTRY or CALCULATOR to call a typing only entry dialog or a touch/typing calculator type entry dialog.
Es basiert auf PyQts QToolButton.
2.5. CamView - Workpiece Alignment and Origin Setting Widget
This widget displays a image from a web camera.
It overlays an adjustable circular and cross hair target over the image.
CamView was built with precise visual positioning in mind.
Diese Funktion dient der Ausrichtung des Werkstücks oder der Nullteilmerkmale mithilfe einer Webcam.
It uses OpenCV vision library.
2.6. DROLabel - Axis Position Display Widget
This will display the current position of an axis.
-
Qjoint_number -
Gelenknummer des anzuzeigenden Offsets (10 gibt den Rotationsoffset an).
-
Qreference_type -
Tatsächlich, relativ oder noch zu fahrende Entfernung (0,1,2).
-
metric_template -
Format of display, e.g.
%10.3f. -
imperial_template -
format of display, e.g.
%9.4f. -
angular_template -
Format of display, e.g.
%Rotational: 10.1f.
Das DROLabel-Widget enthält eine Eigenschaft isHomed, die mit einem Stylesheet verwendet werden kann, um die _Farbe des DRO_Label basierend auf dem Homing-Status der Gelenknummer in LinuxCNC zu ändern.
Here is a sample stylesheet entry that:
-
Sets the font of all
DRO_Labelwidgets, -
Sets the text template (to set resolution) of the DRO,
-
Then sets the text color based on the Qt
isHomedproperty.
DROLabel {
    font: 25pt "Lato Heavy";
    qproperty-imperial_template: '%9.4f';
    qproperty-metric_template: '%10.3f';
    qproperty-angular_template: '%11.2f';
}

DROLabel[isHomed=false] {
    color: red;
}

DROLabel[isHomed=true] {
    color: green;
}
Here is how you specify a particular widget by its objectName in Qt Designer:
DROLabel #dr0_x_axis [isHomed=false] {
    color: yellow;
}
Es basiert auf PyQts QLabel.
2.7. GcodeDisplay - G-code Text Display Widget
This displays G-code in text form, highlighting the currently running line.
Dies kann auch Folgendes anzeigen:
-
MDI history when LinuxCNC is in
MDImode. -
Log entries when LinuxCNC is in
MANUALmode. -
Preference file entries if you enter
PREFERENCEin capitals into theMDILinewidget.
It has a signal percentDone(int) that can be connected to a slot (such as a progressBar to display percent run).
-
auto_show_mdi_status -
Setzen Sie true, damit das Widget im MDI-Modus in den MDI-Verlauf wechselt.
-
auto_show_manual_status -
Setzen Sie true, damit das Widget im manuellen Modus auf das Maschinenprotokoll umschaltet.
The GcodeDisplay properties can be set in a stylesheet with the following code added to the .qss file (the following color choices are random).
EditorBase{
    qproperty-styleColorBackground: lightblue;
    qproperty-styleColor0: black;
    qproperty-styleColor1: #000000; /* black */
    qproperty-styleColor2: blue;
    qproperty-styleColor3: red;
    qproperty-styleColor4: green;
    qproperty-styleColor5: darkgreen;
    qproperty-styleColor6: darkred;
    qproperty-styleColor7: deeppink;
    qproperty-styleColorMarginText: White;
    qproperty-styleColorMarginBackground: blue;
    qproperty-styleFont0: "Times,12,-1,0,90,0,0,0,0,0";
    qproperty-styleFont1: "Times,18,-1,0,90,1,0,0,0,0";
    qproperty-styleFont2: "Times,12,-1,0,90,0,0,0,0,0";
    qproperty-styleFont3: "Times,12,-1,0,90,0,0,0,0,0";
    qproperty-styleFont4: "Times,12,-1,0,90,0,0,0,0,0";
    qproperty-styleFont5: "Times,12,-1,0,90,0,0,0,0,0";
    qproperty-styleFont6: "Times,12,-1,0,90,0,0,0,0,0";
    qproperty-styleFont7: "Times,12,-1,0,90,0,0,0,0,0";
    qproperty-styleFontMargin: "Times,14,-1,0,90,0,0,0,0,0";
}
Für den Standard-G-Code-Lexer des Widgets GcodeDisplay:
-
styleColor0 = Default: Everything not part of the groups below
-
styleColor1 = LineNo and Comments: Nxxx and comments (characters inside of and including () or anything after ; (when used outside of parenthesis) with the exception of the note below)
-
styleColor2 = G-code: G and the digits after
-
styleColor3 = M-code: M and the digits after
-
styleColor4 = Axis: XYZABCUVW
-
styleColor5 = Other: EFHIJKDQLRPST (feed, rpm, radius, etc.)
-
styleColor6 = AxisValue: Values following XYZABCUVW
-
styleColor7 = OtherValue: Values following EFHIJKDQLRPST$
|
Anmerkung
|
For comments, the "OtherValue" color (Color 5) can be used to highlight "print," "debug," "msg," "logopen," "logappend," "logclose" "log," "pyrun," "pyreload" "abort," "probeopen" "probeclose" inside of a parenthesis comment in a line of G-code. As well as "py," if a line that starts with ";py,". Examples: (print, text), (log, text), (msg, text), or (debug, text). Only the last of the examples will be highlighted if there are more than one on the same line. |
Schriftdefinitionen:
"style name, size, -1, 0, bold setting (0-99), italics (0-1),
underline (0-1),0,0,0"
Es basiert auf PyQts QsciScintilla.
2.8. GcodeEditor - G-code Program Editor Widget
This is an extension of the GcodeDisplay widget that adds editing convenience.
It is based on PyQt’s QWidget which incorporates GcodeDisplay widget.
2.9. GCodeGraphics - G-code Graphic Backplot Widget
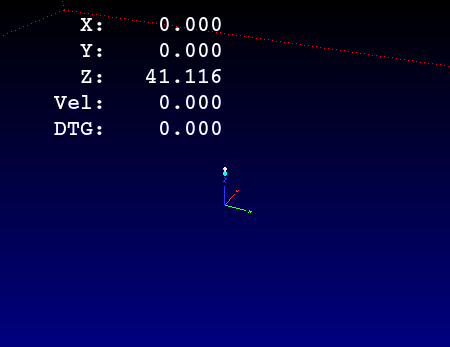
This displays the current G-code in a graphical form.
-
dro-font/dro-large-font(string) -
Sets the small and large DRO font properties
Here we reference with the widget base name; GCodeGraphics
GCodeGraphics{
    qproperty-dro_font:"monospace  bold 12";
}
GCodeGraphics{
    qproperty-dro_large_font:"Times 25";
}
-
_view(string) -
Sets the default view orientation on GUI load.
Valid choices for a lathe are p, y, y2. For other screens, valid choices are p, x, y, z, z2.
The following shows an example of how to set this property (referenced using the widget user selected name):#gcodegraphics{ qproperty-_view: z; }
-
_dro(bool) -
Legt fest, ob die DRO angezeigt werden soll oder nicht.
Im Folgenden wird ein Beispiel für die Einstellung dieser Eigenschaft gezeigt:#gcodegraphics{ qproperty-_dro: False; }
-
_dtg(bool) -
Legen Sie fest, ob die Reststrecke angezeigt werden soll.
Im Folgenden wird ein Beispiel für die Einstellung dieser Eigenschaft gezeigt:#gcodegraphics{ qproperty-_dtg: False; }
-
_metric(bool) -
Legt fest, ob die_ Einheiten standardmäßig_ in metrischen Einheiten angezeigt werden sollen oder nicht.
Im Folgenden wird ein Beispiel für die Einstellung dieser Eigenschaft gezeigt:#gcodegraphics{ qproperty-_metric: False; }
-
_overlay(bool) -
Legt fest, ob das Overlay standardmäßig angezeigt werden soll oder nicht.
Im Folgenden wird ein Beispiel für die Einstellung dieser Eigenschaft gezeigt:#gcodegraphics{ qproperty-_overlay: False; }
-
_offsets(bool) -
Legt fest, ob die Offsets standardmäßig angezeigt werden sollen oder nicht.
Im Folgenden wird ein Beispiel für die Einstellung dieser Eigenschaft gezeigt:#gcodegraphics{ qproperty-_offsets: False; }
-
_small_origin(bool) -
Legt fest, ob standardmäßig der kleine Ursprung angezeigt wird.
Das folgende Beispiel zeigt, wie diese Eigenschaft festgelegt wird:#gcodegraphics{ qproperty-_small_origin: False; }
-
overlay_color(Primär-, Sekundär- oder RGBA-formatierte Farbe) -
Legt die Standard-Overlayfarbe fest.
Im Folgenden wird ein Beispiel für die Einstellung dieser Eigenschaft gezeigt:#gcodegraphics{ qproperty-overlay_color: blue; }
- `background_color ` Hintergrundfarbe, (Primär-, Sekundär- oder RGBA-formatierte Farbe)
-
Legt die Standard-Hintergrundfarbe fest.
Im Folgenden wird ein Beispiel für die Einstellung dieser Eigenschaft gezeigt:#gcodegraphics{ qproperty-background_color: blue; }
-
+_use_gradient_background+(bool) -
Legt fest, ob Standardmäßig ein Hintergrund mit Farbverlauf verwendet wird.
Im Folgenden wird ein Beispiel für die Einstellung dieser Eigenschaft gezeigt:#gcodegraphics{ qproperty-_use_gradient_background: False; }
-
jog_color(primary, secondary, or RGBA formatted color) -
Legt die Standard-Jog-Farbe fest.
Im Folgenden wird ein Beispiel für die Einstellung dieser Eigenschaft gezeigt:#gcodegraphics{ qproperty-jog_color: red; }
-
Feed_color(primary, secondary, or RGBA formatted color) -
Legt die Standard-Farbe für den Vorschub fest.
Im Folgenden wird ein Beispiel für die Einstellung dieser Eigenschaft gezeigt:#gcodegraphics{ qproperty-Feed_color: green; }
-
Rapid_color(primary, secondary, or RGBA formatted color) -
Legt die Standard-Farbe für den Eilgang fest.
Im Folgenden wird ein Beispiel für die Einstellung dieser Eigenschaft gezeigt:#gcodegraphics{ qproperty-Rapid_color: rgba(0, 0, 255, .5); }
-
InhibitControls(bool) -
Legt fest, ob externe Steuerelemente standardmäßig gesperrt werden sollen oder nicht.
Im Folgenden wird ein Beispiel für die Einstellung dieser Eigenschaft gezeigt:#gcodegraphics{ qproperty-InhibitControls:True; }
-
MouseButtonMode(int) -
Ändert das Verhalten der Maustaste zum Drehen, Verschieben oder Zoomen innerhalb der Vorschau.
Im Folgenden wird ein Beispiel für die Einstellung dieser Eigenschaft gezeigt:#gcodegraphics{ qproperty-MouseButtonMode: 1; }
There are 12 valid modes:
Mode
Move
Zoom
Rotate (engl. drehen)
0
Left
Middle
Right
1
Middle
Right
Left
2
Middle
Left
Right
3
Left
Right
Middle
4
Right
Left
Middle
5
Right
Middle
Left
Modes 6-11 are intended for machines that only require a 2D preview such as plasma or some lathes and have no rotate button assigned.
Mode
Move
Zoom
6
Left
Middle
7
Middle
Left
8
Right
Left
9
Left
Right
10
Middle
Right
11
Right
Middle
-
MouseWheelInvertZoom(bool) -
Determines whether or not to invert the zoom direction when zooming with the mouse wheel.
The following shows an example of how to set this property:#gcodegraphics{ qproperty-MouseWheelInvertZoom:True; }
ACTION functionsThe ACTION library can control the G-code graphics widget.
-
ACTION.RELOAD_DISPLAY() -
Reload the current program which recalculates the origin/offsets.
-
ACTION.SET_GRAPHICS_VIEW(_view_) -
The following
viewcommands can be sent:-
clear -
zoom-in -
zoom-out -
pan-up -
pan-down -
pan-right -
pan-left -
rotate-cw -
rotate-ccw -
rotate-up -
rotate-down -
overlay-dro-on -
overlay-dro-off -
overlay-offsets-on -
overlay-offsets-off -
alpha-mode-on -
alpha-mode-off -
inhibit-selection-on -
inhibit-selection-off -
dimensions-on -
dimensions-off -
grid-size -
record-view -
set-recorded-view -
P -
X -
Y -
Y2 -
Z -
Z2 -
set-large-dro
-
set-small-dro
-
-
ACTION.ADJUST_PAN(_X,Y_) -
Legen Sie direkt den relativen Blickwinkel in x- und y-Richtung fest.
-
ACTION.ADJUST_ROTATE(_X,Y_) -
Legen Sie direkt die relative Drehung der Ansicht in x- und y-Richtung fest.
It is based on PyQt’s OpenGL widget.
2.10. StateLabel - Controller-Modi Statusbeschriftungsanzeige-Widget
Dadurch wird eine Beschriftung basierend auf den Zuständen der Maschinensteuerung true/false angezeigt.
Sie können zwischen verschiedenen Texten wählen, die auf wahr oder falsch basieren.
Die Zustände sind über diese Eigenschaften wählbar:
-
css_mode_status -
True, wenn sich die Maschine in G96 befindet Constant Surface Speed Mode.
-
diameter_mode_status -
True, wenn sich die Maschine in G7 befindet Drehmaschine Durchmesser Modus.
-
fpr_mode_status -
True, wenn die Maschine imG95Vorschub je Umdrehung Modus (engl. Feed per Revolution Mode) ist. -
metric_mode_status -
True, wenn sich die Maschine imG21Metrischen Modus befindet.
-
true_textTemplate -
Dies ist der Text, der gesetzt wird, wenn die Option
Trueist.
Sie können Qt rich text code für verschiedene Schriftarten/Farben usw. verwenden.
Eine typische Vorlage für den metrischen Modus im wahren Zustand könnte sein: Metrischer Modus -
false_textTemplate -
Dies ist der Text, der gesetzt wird, wenn die Option
Falseist.
Sie können Qt rich text code für verschiedene Schriftarten/Farben usw. verwenden.
Eine typische Vorlage für den metrischen Modus im falschen Zustand könnte sein: Imperialer Modus.
Es basiert auf PyQts QLabel.
2.11. StatusLabel - Anzeige-Widget für Controller-Variablen-Zustandsbeschriftung
This will display a label based on selectable status of the machine controller.
You can change how the status will be displayed by substituting python formatting code in the text template. You can also use rich text for different fonts/colors etc.
These states are selectable:
-
actual_spindle_speed_status -
Dient zur Anzeige der tatsächlichen Spindeldrehzahl, wie sie vom HAL-Pin "spindle.0.speed-i" gemeldet wird.
Sie wird in RPM umgewandelt.
Normalerweise wird ein "textTemplate" von "%d" verwendet. -
actual_surface_speed_status -
Used to display the actual cutting surface speed on a lathe based on X axis and spindle speed.
It’s converted to distance per minute.
AtextTemplateof%4.1f(feet per minute) andaltTextTemplateof%d(meters per minute) would typically be used. -
blendcode_status -
Shows the current
G64setting. -
current_feedrate_status -
Shows the current actual feedrate.
-
current_FPU_status -
Shows the current actual feed per unit.
-
fcode_status -
Shows the current programmed
Fcode setting. -
feed_override_status -
Shows the current feed override setting in percent.
-
filename_status -
Zeigt den Namen der zuletzt geladenen Datei an.
-
filepath_status -
Shows the last loaded full file path name.
-
gcode_status -
Shows all active G-codes.
-
gcode_selected_status -
Zeigt die aktuell ausgewählte G-Code-Zeile an.
-
halpin_status -
Shows the HAL pin output of a selected HAL pin.
-
jograte_status -
Shows the current QtVCP based Jog Rate.
-
jograte_angular_status -
Shows the current QtVCP based Angular Jog Rate.
-
jogincr_status -
Shows the current QtVCP based Jog increment.
-
jogincr_angular_status -
Shows the current QtVCP based Angular Jog increment.
-
machine_state_status -
Shows the current machine interpreter state using the text described from the machine_state_list.
The interpreter states are:-
Estopped -
Running -
Stopped -
Paused -
Waiting -
Reading
-
-
max_velocity_override_status -
Shows the current max axis velocity override setting.
-
mcode_status -
Shows all active M-codes.
- motion_type_status
-
Shows current type of machine motion using the text described from the motion_type_list.
-
None
-
Rapid
-
Feed
-
Arc
-
Tool Change
-
Probe
-
Rotary Index
-
-
requested_spindle_speed_status -
Shows the requested spindle speed - actual may be different.
-
rapid_override_status -
Shows the current rapid override setting in (0-100) percent.
-
spindle_override_status -
Zeigt die aktuelle Spindel-Override-Einstellung in Prozent an.
-
timestamp_status -
Shows the time based on the system settings.
An example of a usefultextTemplatesetting:%I:%M:%S %p.
See the Python time module for more info. -
tool comment_status -
Gibt den Kommentartext des aktuell geladenen Werkzeugs zurück.
-
tool diameter_status -
Gibt den Durchmesser des aktuell geladenen Werkzeugs zurück.
-
tool_number_status -
Gibt die Werkzeugnummer des aktuell geladenen Werkzeugs zurück.
-
tool_offset_status -
Returns the offset of the current loaded tool, indexed by
index_numberto select axis (0=x,1=y,etc.). -
user_system_status -
Shows the active user coordinate system (
G5xsetting).
-
index_number -
Integer that specifies the tool status index to display.
-
state_label_list -
List of labels used to describe different machine states.
- motion_label_list
-
List of labels used to describe different motion types.
-
halpin_names -
Name of a halpin to monitor (must be the complete name, including the HAL component basename).
-
textTemplate -
This is usually used for imperial (
G20) or angular numerical settings, though not every option has imperial/metric conversion.
This uses Python formatting rules to set the text output.
One can use%sfor no conversion,%dfor integer conversion,%ffor float conversion, etc.
You can also use Qt rich text code.
Typical template used for formatting imperial float numbers to text would be%9.4for%9.4f inch. -
alt_textTemplate -
This is usually used for metric (
G21) numerical settings.
This uses Python formatting rules to set the text output.
Typical template used for formatting metric float to text would be%10.3for%10.3f mm.
Es basiert auf PyQts QLabel.
2.12. StatusImageSwitcher - Controller Status Image Switcher
Status image switcher will switch between images based on LinuxCNC states.
-
*
watch_spindle -
Wechselt zwischen 3 Bildern:
stop,fwd,revs. -
*
watch_axis_homed -
Toggles between 2 images:
axis not homed,axis homed. -
*
watch_all_homed -
Would toggle between 2 images:
not all homed,all homed. -
*
watch_hard_limits -
Würde zwischen 2 Bildern oder einem pro Gelenk umschalten.
Here is an example of using it to display an icon of Z axis homing state:
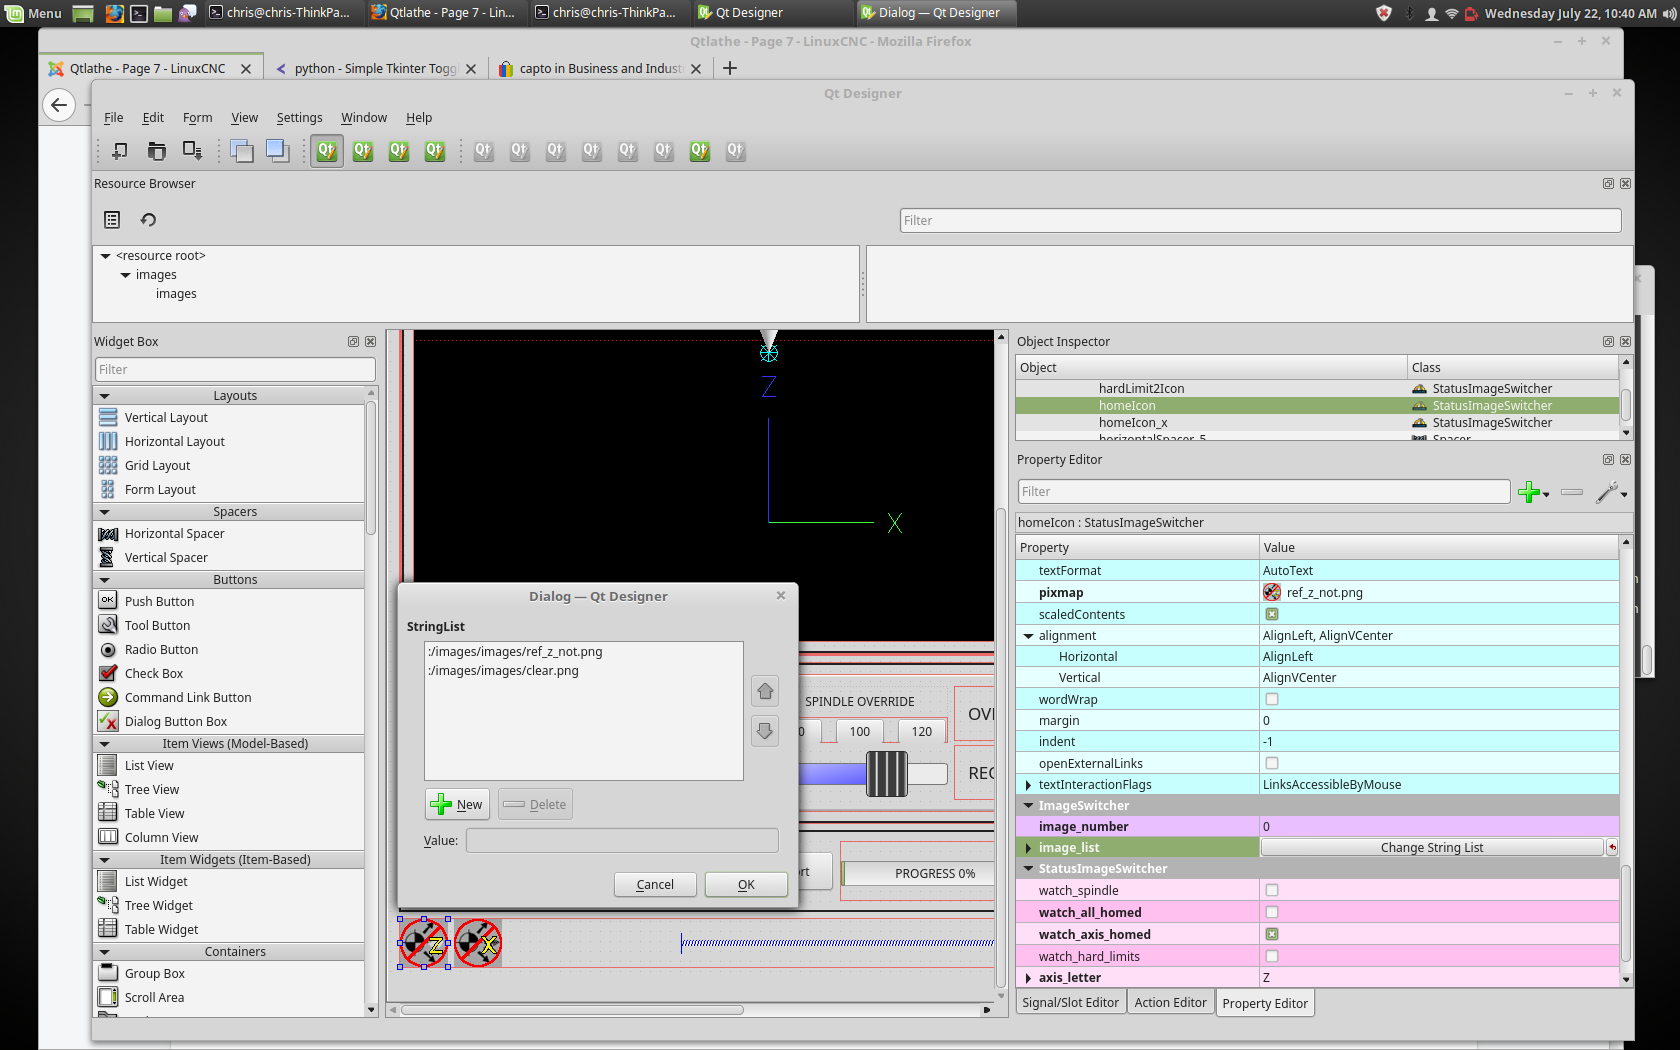
StatusImageSwitcher: Controller Status Image SwitcherIn the properties section notice that:
-
watch_axis_homedis checked -
axis_letteris set to Z
If you double click the image_list a dialog will show and allow you to add image paths to.
If you have one image as an icon and one clear image then that will look like it shows and hides the icon.
Selecting image paths can be done by selecting the pixmap property and selecting an image.
|
Anmerkung
|
The pixmap setting is for test display only and will be ignored outside of Qt Designer. |
-
Right click the image name and you should see Copy path.
-
Click Copy path.
-
Now double click the image list property so the dialog shows.
-
Click the New button.
-
Paste the image path in the entry box.
Do that again for the next image.
Use a clear image to represent a hidden icon.
Sie können die Anzeige der Bilder in der Bilderliste testen, indem Sie die image number (engl. für Bildnummer) ändern. In diesem Fall ist 0 unhomed und 1 würde homed sein.
Dies ist nur für die Testanzeige und wird außerhalb von Qt Designer ignoriert.
2.13. StatusStacked - Mode Status Display Switching Widget
Dieses Widget zeigt eines von drei Panels an, je nach Modus von LinuxCNC.
This allows you to automatically display different widgets on Manual, MDI and Auto modes.
It is based on PyQt’s QStacked widget.
2.14. JogIncrements - Jog Increments Value Selection Widget
This widget allows the user to select jog increment values for jogging.
The jogging values come from the INI file under:
-
[DISPLAY]INCREMENTS, or -
[DISPLAY]ANGULAR_INCREMENTS
This will be available to all widgets through STATUS.
You can select linear or angular increments by the property linear_option in Qt Designer property editor.
Es basiert auf PyQts ComboBox.
2.15. ScreenOption - General Options Setting widget
This widget doesn’t add anything visually to a screen but sets up important options.
This is the preferred way to use these options.
These properties can be set in Qt Designer, in Python handler code or (if appropriate) in stylesheets.
These include:
-
halCompBaseName -
If left empty QtVCP will use the screen’s name as the HAL component’s basename.
If set, QtVCP will use this string as the HAL component’s basename.
If the-ccommand line option is used when loading QtVCP, it will use the name specified on the command line - it overrides all above options.
If you programmatically set the basename in thehandlerfile- it will override all above options.
This property cannot be set in stylesheets. -
notify_option -
Hooking into the desktop notification bubbles for error and messages.
-
notify_max_messages -
Number of messages shown on screen at one time.
-
catch_close_option -
Catching the close event to pop up a 'are you sure' prompt.
-
close_overlay_color -
Farbe der transparenten Ebene, die beim Verlassen angezeigt wird.
-
catch_error_option -
Überwachung des LinuxCNC-Fehlerkanals.
Dies sendet auch die Nachricht überSTATUSan alles, das sich registriert. -
play_sounds_option -
Abspielen von Sounds mit
beep,espeakund dem Systemsound. -
use_pref_file_option -
Setting up a preferences file path.
Using the magic wordWORKINGFOLDERin the preference file path will be replaced with the launched configuration path, e.g.WORKINFOLDER/my_preferences. -
use_send_zmq_option -
Wird verwendet, um ZMQ-basierte ausgehende Nachrichten zu initiieren.
-
use_receive_zmq_messages -
Used to initiate ZMQ based in coming messages.
These messages can be used to call functions in the handler file, allowing external programs to integrate tightly with QtVCP based screens. -
embedded_program_option -
In der INI definierte Programme einbetten.
-
default_embed_tab -
This is the property for a default location to embed external programs.
It should be set to name of a tab page widget in Qt Designer. -
focusOverlay_option -
Focus_overlay legt ein transparentes Bild oder ein farbiges Feld über den Hauptbildschirm, um den Fokus auf ein externes Ereignis zu betonen - normalerweise ein Dialog.
-
messageDialog_option -
Richtet den Nachrichtendialog ein - wird für allgemeine Nachrichten verwendet.
-
message_overlay_color -
Farbe der transparenten Ebene, die angezeigt wird, wenn der Nachrichtendialog eingeblendet wird.
-
closeDialog_option -
Richtet den Standarddialog zum Schließen des Bildschirms ein.
-
entryDialog_option -
Richtet den numerischen Eingabedialog ein.
-
entryDialogSoftKey_option -
Richtet eine schwebende Softwaretastatur ein, wenn der Eingabedialog fokussiert ist.
-
entry_overlay_color -
Farbe der transparenten Ebene, die angezeigt wird, wenn der Eingabedialog angezeigt wird.
-
toolDialog_option -
Richtet den manuellen Werkzeugwechsel-Dialog ein, inklusive HAL-Pin.
-
tool_overlay_color -
Farbe der transparenten Ebene, die angezeigt wird, wenn der Werkzeugdialog angezeigt wird.
-
ToolUseDesktopNotify -
Option zur Verwendung von Desktop-Benachrichtigungsdialogen für manuelle Werkzeugwechseldialoge.
-
ToolFrameless -
Framesless-Dialoge können von Benutzern nicht einfach verschoben werden.
-
fileDialog_option -
Richtet den Dateiauswahldialog ein.
-
file_overlay_color -
Farbe der transparenten Ebene, die angezeigt wird, wenn der Dateidialog angezeigt wird.
- keyboardDialog_option
-
Richtet ein Tastatureingabe-Widget ein.
-
keyboard_overlay_color -
Farbe der transparenten Ebene, die angezeigt wird, wenn der Tastaturdialog angezeigt wird.
-
vesaProbe_option -
Richtet den Versa-Style-Probe-Dialog ein.
-
versaProbe_overlay_color -
Farbe der transparenten Ebene, die angezeigt wird, wenn der Dialog
versaProbeangezeigt wird. -
macroTabDialog_option -
legt den Makro-Auswahldialog fest.
-
macroTab_overlay_color -
Farbe der transparenten Ebene, die angezeigt wird, wenn der
macroTab-Dialog angezeigt wird. -
camViewDialog_option -
Richtet den Kameraausrichtungsdialog ein.
-
camView_overlay_color -
Farbe der transparenten Ebene, die angezeigt wird, wenn der Dialog
camViewangezeigt wird. -
toolOffset_option -
Sets up the tool offset display/editor dialog.
-
toolOffset_overlay_color -
Farbe der transparenten Ebene, die angezeigt wird, wenn der
toolOffset-Dialog angezeigt wird. -
originOffset_option -
Richtet das Dialogfeld für die Anzeige/Editierung des Ursprungs ein.
-
originOffset_overlay_color -
Farbe der transparenten Ebene, die angezeigt wird, wenn der
originOffset-Dialog angezeigt wird. -
calculatorDialog_option -
Sets up the calculator entry dialog.
-
calculator_overlay_color -
Farbe der transparenten Ebene, die angezeigt wird, wenn das Dialogfeld "Rechner" angezeigt wird.
-
machineLogDialog_option -
Richtet einen Dialog ein, um Protokolle von der Maschine und QtVCP anzuzeigen.
-
machineLog_overlay_color -
Farbe der transparenten Ebene, die angezeigt wird, wenn der
machineLog-Dialog angezeigt wird. -
runFromLineDialog_option -
Richtet einen Dialog ein, der die Startoptionen anzeigt, wenn die Maschinenausführung von einer beliebigen Zeile aus gestartet wird.
-
runFromLine_overlay_color -
Farbe der transparenten Ebene, die angezeigt wird, wenn der
runFromLine-Dialog angezeigt wird.
Der Screendesigner wählt die Standardeinstellungen des Widgets screenOptions aus.
Once chosen, most won’t ever need to be changed. But if needed, some can be changed in the handler file or in stylesheets.
-
In the handler file:
Here we reference the widget by the Qt Designer user defined name:# red,green,blue,alpha 0-255 color = QtGui.QColor(0, 255, 0, 191) self.w.screen_options.setProperty('close_overlay_color', color) self.w.screen_options.setProperty('play_sounds_option',False)
-
In style sheets:
Here we can reference the widget by Qt Designer user defined name or by widget class name./* red, green, blue 0-255, alpha 0-100% or 0.0 to 1.0 */ /* the # sign is used to refer to Qt Designer defined widget name */ /* matches/applied to only this named widget */ #screen_options { qproperty-close_overlay_color: rgba(0, 255, 0, 0.75) }
/* red, green, blue 0-255, alpha 0-100% or 0.0 to 1.0 */
/* use widget class name */
/* matches/applied to all widgets of this class */
ScreenOptions {
  qproperty-close_overlay_color: rgba(0, 255, 0, 0.75)
}
Some settings are only checked on startup so will not cause changes after startup. In these cases you would need to make the changes in Qt Designer only.
Wenn die Option Voreinstellungsdatei ausgewählt ist, erstellt das Widget screenOption eine INI-basierte Voreinstellungsdatei.
Während andere QtVCP Widgets diese Liste ergänzen, fügt das screenOptions Widget diese Einträge unter den folgenden Überschriften hinzu:
-
[SCREEN_OPTIONS] -
-
catch_errors(bool) -
desktop_notify(bool) -
Whether to display errors/messages in the system’s notification mechanism.
-
notify_max_msgs(int) -
Anzahl der angezeigten Fehler zu einem Zeitpunkt.
-
shutdown_check(bool) -
Ob ein Bestätigungsdialog erscheinen soll.
-
sound_player_on(bool) -
Schaltet alle Töne ein oder aus.
-
-
[MCH_MSG_OPTIONS] -
-
mchnMsg_play_sound(bool) -
Um Warntöne wiederzugeben, wenn ein Dialogfeld angezeigt wird.
-
mchnMsg_speak_errors(bool) -
Verwendung von Espeak, um Fehlerbotschaften zu sprechen.
-
mchnMsg_speak_text(bool) -
Espeak verwenden, um alle anderen Nachrichten zu sprechen.
-
mchnMsg_sound_type(str) -
Ton, der abgespielt wird, wenn Nachrichten angezeigt werden. Siehe Hinweise unten.
-
-
[USER_MSG_OPTIONS] -
-
usermsg_play_sound(bool) -
Um Warntöne wiederzugeben, wenn ein Dialogfeld angezeigt wird.
-
userMsg_sound_type(str) -
Ton, der abgespielt wird, wenn Benutzermeldungen angezeigt werden. Siehe Hinweise unten.
-
userMsg_use_focusOverlay(bool)
-
-
[SHUTDOWN_OPTIONS] -
-
shutdown_play_sound(bool) -
shutdown_alert_sound_type(str) -
Ton, der abgespielt wird, wenn Nachrichten angezeigt werden. Siehe Hinweise unten.
-
shutdown_exit_sound_type(str) -
Ton, der abgespielt wird, wenn Nachrichten angezeigt werden. Siehe Hinweise unten.
-
shutdown_msg_title(str) -
Kurzer Titelstring, der im Dialog angezeigt wird.
-
shutdown_msg_focus_text(str) -
Großer Text, der in die Fokusebene eingeblendet wird.
-
shutdown_msg_detail(str) -
Longer descriptive string to display in dialog.
-
-
NOTIFY_OPTIONS -
-
notify_start_greeting(bool) -
Whether to display a greeting dialog on start-up.
-
notify_start_title(str) -
Kurzer Titelstring.
Wenn die Option "Sprechen" ebenfalls ausgewählt ist, wird der Titel mit Espeak gesprochen. -
notify_start_detail(str) -
Längere Zeichenfolge zur Beschreibung.
-
notify_start_timeout(int) -
Zeit in Sekunden bis zur Anzeige vor dem Schließen.
-
*_sound_type Einträge-
System Sounds
In Debian/Ubuntu/Mint based installations these system sounds should be available as sound-type entries above:-
ERROR -
READY -
DONE -
ATTENTION -
RING -
LOGIN -
LOGOUT -
BELL
Diese Sound-Optionen erfordern die Installation von
python3-gst1.0. -
-
Audio Files
You can also specify a file path to an arbitrary audio file.
You can use~in path to substitute for the user home file path. -
Kernel Beeps
If thebeepkernel module is installed and it is not disabled, these sound-type entries are available:-
BEEP -
BEEP_RING -
BEEP_START
-
-
Text-To-Speech
If the Espeak module (python3-espeak) is installed, you can use theSPEAKentry to pronounce text: -
SPEAK '_my message_'
2.16. StatusSlider - Controller-Einstellungs-Schieberegler-Widget
This widget allow the user to adjust a LinuxCNC setting via a slider.
Die Kurzbeschreibung kann folgendes anpassen:
-
Jog rate
-
Winkel-Jog-Rate
-
Vorschubgeschwindigkeit
-
Spindel-Override-Rate
-
Eilgang Übersteuerungsrate (engl. rapid override rate)
StatusSlider has the following properties:
-
halpin_option -
Sets option to make a HAL float pin that reflects current value.
-
rapid_rate -
Selects a rapid override rate slider.
-
feed_rate -
Selects a feed override rate slider.
-
spindle_rate -
Selects a spindle override rate slider.
-
jograte_rate -
Wählt einen linearen Jograte-Schieberegler aus.
-
jograte_angular_rate -
Selects a angular jograte slider.
-
max_velocity_rate -
Selects a maximum velocity rate slider.
-
alertState -
String zum Definieren der Stiländerung:
read-only(enlg. nur lesen),under(engl. für unter),over(engl. für über) undnormal. -
alertUnder -
Legt den Float-Wert fest, der dem Stylesheet eine "Unter"-Warnung signalisiert.
-
alertOver -
Legt den Gleitkommawert fest, der dem Stylesheet die Warnung "Über" signalisiert.
Diese können eingestellt werden in:
-
Qt Designer
-
Python handler code,
self.w.status_slider.setProperty('spindle_rate',True)
self.w.status_slider.setProperty('alertUnder',35)
self.w.status_slider.setProperty('alertOver',100)
-
Oder (gegebenenfalls) in Stylesheets.
/* Warnfarben für Übersteuerungen, wenn sie außerhalb des normalen Bereichs liegen*/
/* Name des Widget-Objekts ist slider_spindle_ovr */

#slider_spindle_ovr[alertState='over'] {
    background: red;
}
#slider_spindle_ovr[alertState='under'] {
    background: yellow;
}
It is based on PyQt’s QSlider.
2.17. StateLED - Controller-Status-LED-Widget
This widget gives status on the selected LinuxCNC state.
Die Statusoptionen sind:
-
is_paused_status -
is_estopped_status -
is_on_status -
is_idle_status_ -
is_homed_status -
is_flood_status -
is_mist_status -
is_block_delete_status -
is_optional_stop_status -
is_joint_homed_status -
is_limits_overridden_status -
is_manual_status -
is_mdi_status -
is_auto_status -
is_spindle_stopped_status -
is_spindle_fwd_status -
is_spindle_rev_status -
is_spindle_at_speed_status -
is_neg_limit_tripped -
is_pos_limit_tripped -
is_limits_tripped -
Es gibt Eigenschaften, die geändert werden können:
-
halpin_option -
Fügt einen Ausgangspin hinzu, der den ausgewählten Zustand wiedergibt.
-
invert_state_status -
Invert the LED state compared to the LinuxCNC state.
-
diameter -
Diameter of the LED.
-
color -
Color of the LED when on.
-
off_color -
Color of the LED when off.
-
alignment -
Qt-Hinweis zur Ausrichtung.
-
state -
Aktueller Zustand der LED (zum Testen in Qt Designer).
-
flashing -
Schaltet die Blinkoption ein und aus.
-
flashRate -
Sets the flash rate.
The LED properties can be defined in a stylesheet with the following code added to the .qss file.
State_LED #name_of_led{       <1>
  qproperty-color: red;
  qproperty-diameter: 20;
  qproperty-flashRate: 150;
}
-
name_of_ledwäre der im Editor von Qt Designer definierte Name.
It is based on the LED widget.
2.18. StatusAdjustmentBar - Widget zum Einstellen von Controller-Werten
Dieses Widget ermöglicht die Einstellung von Werten über Schaltflächen, während ein Balken angezeigt wird.
Außerdem gibt es einen optionalen Hoch/Tief-Knopf, der gedrückt gehalten werden kann, um die Stufen einzustellen.
Die Kurzbeschreibung kann folgendes anpassen:
-
Jog rate
-
Winkel-Jog-Rate
-
Vorschubgeschwindigkeit
-
Spindel-Override-Rate
-
Eilgang Übersteuerungsrate (engl. rapid override rate)
It is based on PyQt’s QProgressBar.
2.19. SystemToolButton - Widget zur Auswahl des Benutzersystems
This widget allows you to manually select a G5x user system by pressing and holding.
Wenn Sie den Text der Schaltfläche nicht festlegen, wird sie automatisch auf das aktuelle System aktualisiert.
Es basiert auf PyQts QToolButton.
2.20. MacroTab - Spezielles Makro-Widget
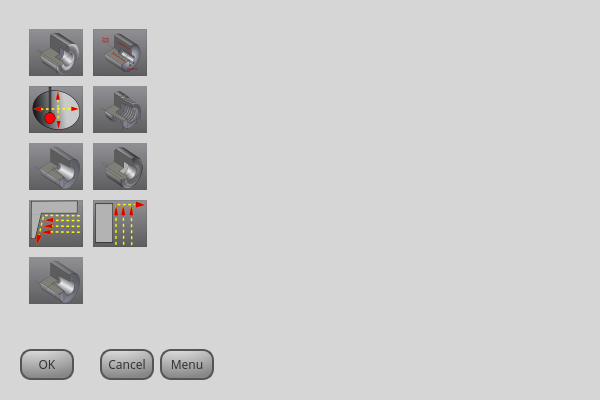
MacroTab: Spezielles Makro-WidgetMit diesem Widget kann der Benutzer spezielle Makroprogramme für die Erledigung kleinerer Aufgaben auswählen und anpassen.
Es verwendet Bilder zur visuellen Darstellung des Makros und für ein Symbol.
Es sucht nach speziellen Makros unter Verwendung der INI-Definition:
[RS274NGC]
SUBROUTINE_PATH =
Die Makros sind O-Wort-Unterprogramme mit speziellen Kommentaren für die Zusammenarbeit mit dem Launcher. Die ersten drei Zeilen müssen die untenstehenden Schlüsselwörter enthalten, die vierte ist optional.
Hier ist ein Beispiel für die ersten vier Zeilen einer O-Word-Datei:
; MACROCOMMAND = Entry1,Entry2
; MACRODEFAULTS = 0,true
; MACROIMAGE = my_image.svg,Icon layer number,Macro layer number
; MACROOPTIONS = load:yes,save:yes,default:default.txt,path:~/macros
MACROCOMMANDDies ist die erste Zeile in der O-Wort-Datei.
Es handelt sich um eine durch Kommata getrennte Liste von Text, der über einem Eintrag angezeigt werden soll.
Es gibt eine für jede erforderliche Variable in der O-Wort-Funktion.
Wenn das Makro keine Variablen benötigt, lassen Sie es leer:
; MACROCOMMAND=
MACRODEFAULTSDies muss die zweite Zeile in der O-Wort-Datei sein.
Es handelt sich um eine durch Kommata getrennte Liste der Standardwerte für jede Variable in der O-Wort-Funktion.
Wenn Sie das Wort "true" oder "false" in der Liste verwenden, wird ein "checkbutton" angezeigt.
MACROIMAGEDies muss die dritte Zeile in der O-Wort-Datei sein.
-
SVG Images
If using SVG image files, they must end with the.svgextension.
Die Bilder müssen zu SVG-Ebenen hinzugefügt werden, die zur Definition der verschiedenen Bilder für Makro und Symbol verwendet werden.
Wert ist eine durch Kommata getrennte Liste von drei geordneten Feldern:
; MACROIMAGE=filename.svg,macro_layer_name[,icon_layer_name]
Mit:
-
_dateiname_.svg -
Name der SVG-Bilddatei als erstes Feld.
Es wird davon ausgegangen, dass sie sich im selben Ordner befindet wie die O-Wort-Datei. -
*macro_layer_name -
Name der Makrobildebene als zweites Feld.
-
icon_layer_name -
Name der Ikonenebene als optionales drittes Feld. Fehlt der dritte Eintrag, wird für Makro und Symbol das gleiche Bild verwendet.
-
-
PNG/JPG Images:
Value remains a comma separated list:; MACROIMAGE=macro_image.(png|jpg)[,icon_image.(png|jpg)]
Mit:
-
_macro_image_.(png|jpg) -
Name der Bilddatei des Makros als erstes Feld.
Es wird davon ausgegangen, dass sich die Bilddatei im selben Ordner befindet wie das Makro. -
_icon_image_.(png|jpg) -
Icon image file name as optional second field.
If the second entry is missing the same image will be used for macro and image.
-
Wenn das Schlüsselwort vorhanden ist, aber die Einträge fehlen, werden keine Bilder verwendet.
MACROOPTIONSDiese optionale Zeile muss die vierte Zeile in der O-Wort-Datei sein.
Es handelt sich um eine durch Kommata getrennte Liste von Schlüsselwörtern und Daten:
-
LOAD:yes -
Zeigt einen Button zum Laden an.
-
SAVE:yes -
Zeigt einen Button zum Speichern an.
2.21. MDILine - MDI-Befehlszeileneingabe-Widget
Hier kann man MDI-Befehle eingeben.
Eine Popup-Tastatur ist verfügbar.
There are also embedded commands available from this widget.
Geben Sie einen dieser Befehle ein, um das entsprechende Programm zu laden oder die Funktion aufzurufen:
-
HALMETER -
Startet das LinuxCNC Link:../hal/tools.html#sec:halmeter[
halmeter] Dienstprogramm. -
HALSHOW -
Startet das LinuxCNC Link:../hal/halshow.html#cha:halshow[
halshow] Dienstprogramm. -
HALSCOPE -
Startet das LinuxCNC Link:../hal/tutorial.html#sec:tutorial-halscope[
halscope] Dienstprogramm. -
STATUS -
Startet das LinuxCNC Link:../man/man1/linuxcnctop.1.html[
status] Dienstprogramm. -
CALIBRATION -
Starts LinuxCNC Calibration
-
CLASSICLADDER -
Startet die Link:../ladder/classic-ladder.html[ClassicLadder GUI], wenn die ClassicLadder realtime HAL component durch die Konfigurationsdateien des Rechners geladen wurde.
-
PREFERENCE -
Lädt die Einstellungsdatei in den
GcodeEditor. -
CLEAR HISTORY -
Löscht den MDI-Verlauf.
-
net -
Siehe Link:../man/man1/halcmd.1.html#COMMANDS[
halcmd netcommands].
Wenn der Befehl nicht erfolgreich ist, wird ein Fehler ausgegeben.-
Syntax:
net <signal name> <pin name> -
Beispiel:
net plasmac:jog-inhibit motion.jog-stop
-
-
setp -
Sets den Wert eines Pins oder einer parameter.
Gültige Werte hängen vom Objekttyp des Pins oder Parameters ab.
Dies führt zu einem Fehler, wenn die Datentypen nicht übereinstimmen oder der Pin mit einem Signal verbunden ist.-
Syntax:
setp <Pin/Parameter-Name> <Wert> -
Beispiel:
setp plasmac.resolution 100
-
-
unlinkp -
Trennt einen Pin von einem Signal.
Ein Fehler tritt auf, wenn der Pin nicht vorhanden ist.
Running LinuxCNC von Terminal kann helfen, die Ursache zu bestimmen, wie Fehlermeldungen vonhal_lib.cwird dort angezeigt werden.-
Syntax:
unlinkp <Pin-Name> -
Beispiel:
unlinkp motion.jog-stop
-
|
Anmerkung
|
Die Funktion MDILine spindle_inhibit kann von der Handler-Datei einer grafischen Benutzeroberfläche verwendet werden, um die Spindelbefehle M3, M4 und M5 bei Bedarf zu sperren. |
Es basiert auf PyQts QLineEdit.
2.22. MDIHistory - MDI-Befehlsverlaufs-Widget
Zeigt eine scrollbare Liste vergangener MDI-Befehle an.
An edit line is embedded for MDI commands. The same MDILine embedded commands may be accessed from this widget.
Der Verlauf wird in einer Datei aufgezeichnet, die in der INI unter der Überschrift [DISPLAY] definiert ist (dies ist die Standardeinstellung):
MDI_HISTORY_FILE = '~/.axis_mdi_history'
2.23. MDITouchy - Touchscreen-MDI-Eingabe-Widget
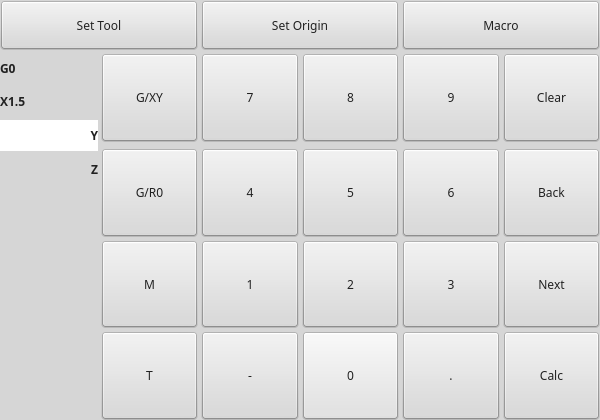
MDITouchy: Touchscreen-MDI-Eingabe-WidgetDieses Widget zeigt Buttons und Eingabezeilen für die Eingabe von MDI-Befehlen an.
Basierend auf LinuxCNC’s Touchy Screen’s MDI-Eingabe-Prozess, dessen großen Buttons sind sehr nützlich für Touchscreens.
So verwenden Sie MDITouchy:
-
First press one of the
G/XY,G/RO,MorTbutton. On the left will show the entry fields that can be filled out. -
Drücken Sie dann „Weiter“ und „Zurück“, um zwischen den Feldern zu navigieren.
-
Calcöffnet einen Taschenrechnerdialog. -
Clearclears the current entry. -
Set Toolwill call for a tool change. -
Set Originwill allow setting the origin of the current G6x system. -
Macrowill call any available macro ngc programs.
The widget requires an explicit call to MDITouchy Python code to actually run the MDI command:
-
For handler file code
If the widget was named mditouchy in Qt Designer, the command below would run the displayed MDI command:self.w.mditouchy.run_command()
-
For action button use
If the widget was named mditouchy in Qt Designer, use the action button’s Call Python commands option and enter:INSTANCE.mditouchy.run_command()
Die Makro-Schaltfläche durchläuft die in der INI-Überschrift [ANZEIGE] definierten Makros.
Fügen Sie eine oder mehrere MACRO-Zeilen im folgenden Format hinzu:
MACRO = macro_name [param1] [... paramN]
Im folgenden Beispiel ist increment der Name des Makros, und es akzeptiert zwei Parameter, die xinc und yinc heißen.
MACRO = increment xinc yinc
Now, place the macro in a file named macro_name.ngc in the PROGRAM_PREFIX directory, or into any directory in the SUBROUTINE_PATH specified in the INI file.
Um bei dem obigen Beispiel zu bleiben, würde es increment.ngc heißen und sein Inhalt könnte wie folgt aussehen:
O<increment> sub
G91 G0 X#1 Y#2
G90
O<increment> endsub
Beachten Sie, dass der Name des Unterprogramms exakt mit dem Dateinamen und dem Makronamen übereinstimmt, einschließlich Groß- und Kleinschreibung.
When you invoke the macro by pressing the Macro button you can enter values for parameters (xinc and yinc in our example).
These are passed to the macro as positional parameters: #1, #2… #N respectively.
Parameters you leave empty are passed as value 0.
Wenn es mehrere verschiedene Makros gibt, drücken Sie wiederholt die Makrotaste, um sie zu durchlaufen.
Wenn Sie in diesem einfachen Beispiel -1 für xinc eingeben und die Ausführung des MDI-Zyklus aufrufen, wird eine schnelle G0-Bewegung ausgelöst, die eine Einheit nach links geht.
Diese Makrofunktion ist nützlich für das Antasten von Kanten/Löchern und andere Einrichtungsaufgaben sowie vielleicht für das Fräsen von Löchern oder andere einfache Operationen, die vom Bedienfeld aus durchgeführt werden können, ohne dass speziell geschriebene G-Code-Programme erforderlich sind.
2.24. OriginOffsetView - Ursprungsansicht und Einstellungs-Widget
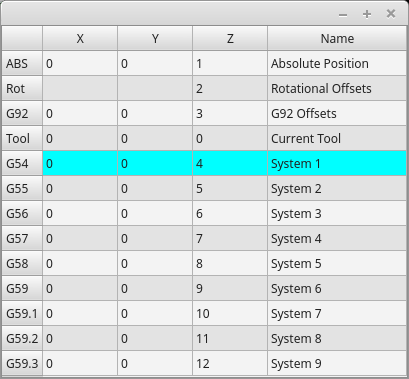
OriginOffsetsView: Origins-Ansicht und Einstellungs-WidgetDieses Widget ermöglicht es, Offsets von Benutzer-spezifizierten Ursprüngen direkt zu visualisieren und zu ändern.
Es wird die Parameterdatei von LinuxCNC für vorgenommene oder gefundene Änderungen aktualisieren.
Die Einstellungen können in LinuxCNC nur nach der Referenzfahrt und im Ruhezustand des Motion Controllers geändert werden.
The display and entry will change between metric and imperial, based on LinuxCNC’s current G20 / G21 setting.
The current in-use user system will be highlighted.
Extra actions can be integrated to manipulate settings.
These actions depend on extra code added either to a combined widget, like originoffsetview dialog, or the screens handler code.
Typical actions might be Clear Current User offsets or Zero X.
Clicking on the columns and rows allows one to adjust the settings.
A dialog can be made to popup for data or text entry.
The comments section will be recorded in the preference file.
Es basiert auf PyQt’s QTableView, QAbstractTableModel, und ItemEditorFactory.
Eigenschaften, Funktionen und Stile der PyQt-Basisobjekte sind immer verfügbar.
OriginOffsetView has the following properties:
-
dialog_code_string -
Sets which dialog will pop up with numerical entry.
-
test_dialog_code_string -
Sets which dialog will pop up with text entry.
-
metric_template -
Metric numerical data format.
-
imperial_template -
Imperial numerical data format.
-
styleCodeHighlight -
Current in-use user system highlight color.
Diese können eingestellt werden in:
-
Qt Designer, in
-
Python handler code
self.w.originoffsetview.setProperty('dialog_code','CALCULATOR')
self.w.originoffsetview.setProperty('metric_template','%10.3f')
-
Or (if appropriate) in stylesheets
OriginOffsetView{
  qproperty-styleColorHighlist: lightblue;
}
2.25. StateEnableGridlayout - Controller State Enabled Container Widget
_disable the widgets inside it depending on LinuxCNC's current state_.This is a container that other widgets can be placed in.
Embedded widgets are be greyed-out when the StateEnableGridlayout is disabled.
It can selectably react to:
-
Machine on
-
Interpreter idle
-
E-stop off
-
All-homed
It is based on PyQt’s QGridLayout.
2.26. MachineLog - Machine Events Journal Display Widget
FIXME MachineLog documentation
2.27. JointEnableWidget - FIXME
FIXME JointEnableWidget documentation
2.28. StatusImageSwitcher - Controller Status Image Switching Widget
Dieses Widget wird Bilder basierend auf dem LinuxCNC-Status anzeigen.
You can watch:
-
the state of the spindle,
-
the state of all homed,
-
the state of a certain axis homed,
-
the state of hard limits.
It is based on PyQt’s FIXME
2.29. FileManager - File Loading Selector Widget
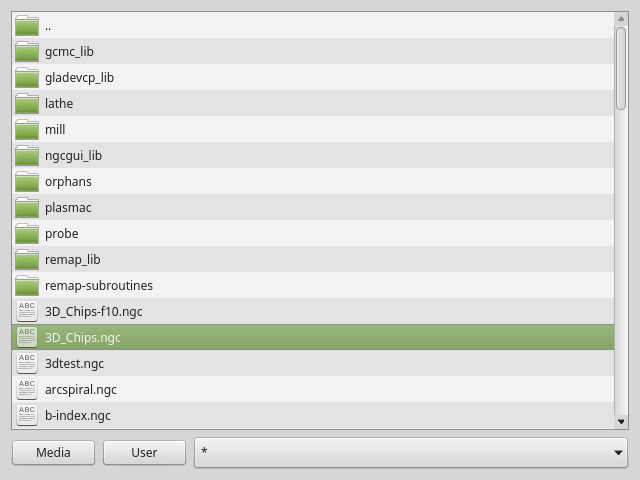
FileManager: File Loading Selector WidgetThis widget is used to select files to load.
Sie verfügt über die Möglichkeit, die Namen mit Hardware wie einem Handgerät (engl. MPG) zu kennzeichnen.
One can class patch the function load(self,fname) to customize file loading.
The function getCurrentSelected() will return a Python tuple, containing the file path and whether it is a file.
temp = FILEMANAGER.getCurrentSelected()
print('filepath={}'.format(temp[0]))
if temp[1]:
    print('Is a file')
-
doubleClickSelection(bool) -
Determines whether or not to require double clicking on a folder.
Single clicking a folder (False) is enabled by default and is intended for touch screen users.
The following shows an example of how to set this property:#filemanager { qproperty-doubleClickSelection: True; }
-
showListView(bool) -
Determines whether or not to show the file/folder structure in list form.
Table view (False) is enabled by default.
The following shows an example of how to set this property:#filemanager { qproperty-showListView: True; }
It is based on PyQt’s FIXME
2.30. RadioAxisSelector - FIXME
FIXME RadioAxisSelector documentation
2.31. ToolOffsetView - Tools Offsets View And Edit Widget
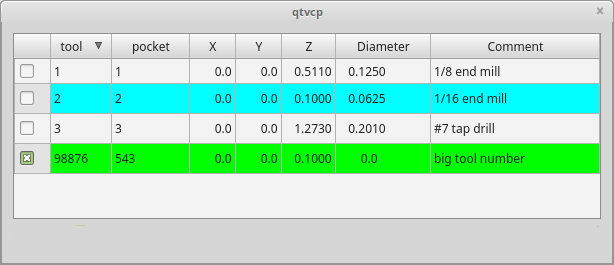
ToolOffsetView: Tools Offsets View And Edit WidgetThis widget displays and allows one to modify tools offsets.
It will update LinuxCNC’s tool table for changes made or found.
The tool settings can only be changed in LinuxCNC after homing and when the motion controller is idle.
The display and entry will change between metric and imperial based on LinuxCNC’s current G20/G21 setting.
The current in-use tool will be highlighted, and the current selected tool will be highlighted in a different color.
The checkbox beside each tool can be used to select too for an action that depends on extra code added either to a combined widget, like the toolOffsetView dialog or the screens handler code.
Typical actions are load selected tool, delete selected tools, etc.
Clicking on the columns and rows allows one to adjust the settings.
A dialog can be made to popup for data or text entry.
The comments section will typically be displayed in the manual tool change dialog.
If using a lathe configuration, there can be columns for X and Z wear.
To use these columns to adjust the tool wear, it requires a remapped tool change routine.
Es basiert auf PyQt’s QTableView, QAbstractTableModel, und ItemEditorFactory.
Eigenschaften, Funktionen und Stile der PyQt-Basisobjekte sind immer verfügbar.
ToolOffsetView hat Eigenschaften, die im Qt Designer, im Python-Handler-Code oder (falls zutreffend) in Stylesheets eingestellt werden können:
-
dialog_code_string -
Sets which dialog will pop up with numerical entry.
-
test_dialog_code_string -
Sets which dialog will pop up with text entry.
-
metric_template -
Metric numerical data format.
-
imperial_template -
Imperial numerical data format.
-
styleCodeHighlight -
Current tool-in-use highlight color.
-
styleCodeSelected -
Selected highlight color.
In a handler file:
self.w.tooloffsetview.setProperty('dialog_code','CALCULATOR')
self.w.tooloffsetview.setProperty('metric_template','%10.3f')
und in Stylesheets:
ToolOffsetView{
  qproperty-styleColorHighlist: lightblue;
  qproperty-styleColorSelected: #444;
}
Die Funktion ToolOffsetView hat einige Funktionen, die für Screenbuilder nützlich sind, um Aktionen hinzuzufügen:
-
add_tool() -
Fügt ein leeres Dummy-Werkzeug (99) hinzu, das der Benutzer nach Belieben bearbeiten kann.
-
delete_tools() -
Löscht die in der Checkbox ausgewählten Werkzeuge.
-
get_checked_list() -
Gibt eine Liste der durch Ankreuzfelder ausgewählten Werkzeuge zurück.
-
set_all_unchecked() -
Hebt die Markierung aller ausgewählten Werkzeuge auf.
self.w.tooloffsetview.add_tool()
self.w.tooloffsetview.delete_tools()
toolList = self.w.tooloffsetview.get_checked_list()
self.w.tooloffsetview.set_all_unchecked()
2.32. BasicProbe - Einfaches Fräs-Tast-Widget
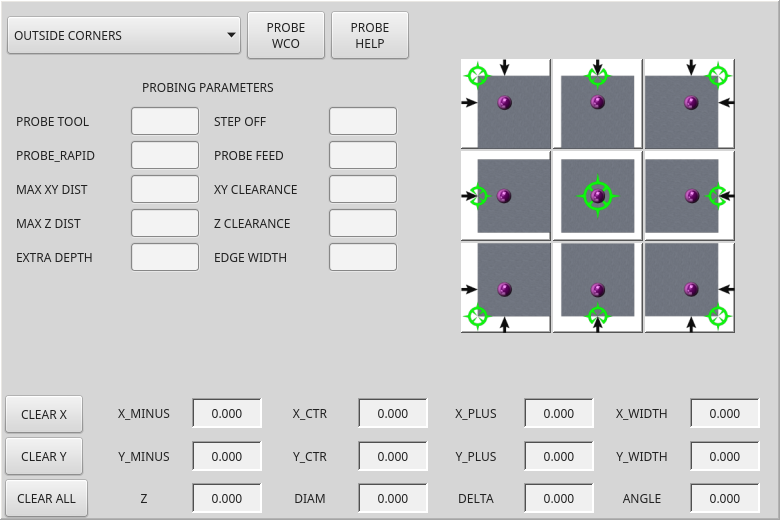
Widget zum Sondieren auf einer Fräse. Wird vom QtDragon-Bildschirm verwendet.
2.33. VersaProbe - Mill Probing Widget
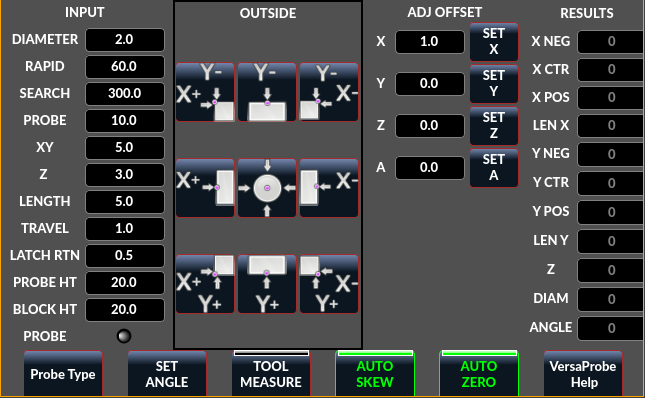
VersaProbe: Mill Probing WidgetWidget zum Sondieren auf einer Fräse. Wird vom QtDragon-Bildschirm verwendet.
3. Dialog-Widgets
Dialoge werden verwendet, um unmittelbar benötigte Informationen gezielt darzustellen oder abzufragen.
Die typischerweise verwendeten Dialoge können mit dem ScreenOptions widget geladen werden.
Sie können sie auch direkt zur UI hinzufügen - allerdings muss jedes Dialogfeld einen eindeutigen Startnamen haben, sonst werden mehrere Dialogfelder nacheinander angezeigt.
You can show dialogs directly with Python code, but a safer way is to use STATUS messages to request the dialog to launch and to return the gathered information.
-
Register to
STATUSchannel:
To set this up, first register to catch thegeneralmessage fromSTATUS:STATUS.connect('general',self.return_value)
-
Add a function to call a dialog:
This function must build a messagedictto send to the dialog.
This message will be passed back in the general message with the addition of thereturnvariable.
It is possible to add extra user information to the message. The dialog will ignore these and pass them back.-
NAME -
Launches code name of dialog to show.
-
ID -
A unique id so we process only a dialog that we requested.
-
TITLE -
The title to use on the dialog.
def show_dialog(self):
    mess = {'NAME':'ENTRY','ID':'__test1__',
            'TITLE':'Test Entry'}
    ACTION.CALL_DIALOG, mess)
-
-
Add a callback function that processes the general message:
Keep in mind this function will get all general messages so thedictkeynames are not guaranteed to be there. Using the.get()function and/or usingtry/exceptis advisable. This function should:-
check the name and id is the same as we sent,
-
then extract the return value and any user variables.
# Verarbeitung der STATUS return message
def return_value(self, w, message):
    rtn = message.get('RETURN')
    code = bool(message.get('ID') == '__test1__')
    name = bool(message.get('NAME') == 'ENTRY')
    if code and name and not rtn is None:
        print('Entry return value from {} = {}'.format(code, rtn))
-
3.1. LcncDialog - Allgemeines Nachrichtendialog-Widget
Dies ist ein Allgemeines Nachrichten-Dialog-Widget.
Wenn ein Fokus-Overlay-Widget vorhanden ist, kann es signalisieren, dass es angezeigt werden soll.
Wenn die Klangbibliothek eingerichtet ist, kann sie Klänge abspielen.
Es gibt Optionen, die gesetzt werden können, wenn ein Dialog angefordert wird, diese würden der Nachricht dict hinzugefügt.
-
TITLE -
Titel des Dialogfensters.
-
MESSAGE -
Titel Nachrichtentext in Fettdruck.
-
MORE -
Standardtext unter der Überschrift.
-
DETAILS -
Ursprünglicher versteckter Text.
-
TYPE(OK|YESNO|OKCANCEL) -
ICON(QUESTION|INFO|CRITICAL|WARNING) -
PINNAME -
Noch nicht implementiert.
-
FOCUSTEXT(overlay text|None) -
Text, der angezeigt werden soll, wenn das Fokus-Overlay verwendet wird. Verwenden Sie
Nonefür keinen Text. -
FOCUSCOLOR(QColor(_R, G, B, A_)) -
Farbe, die verwendet werden soll, wenn das Fokus-Overlay verwendet wird.
-
PLAYALERT -
Abzuspielender Ton, falls vorhanden, z.B.
SPEAK<Spoken_message> .
Bei der Verwendung der Funktion "Abfrage-Dialog" von "STATUS" ist der "Standard-Startname" MESSAGE.
Sie basiert auf der QMessagebox von PyQt.
3.2. ToolDialog - Dialog-Widget für den manuellen Werkzeugwechsel
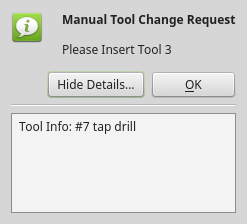
ToolDialog: Dialog zum manuellen WerkzeugwechselDies wird als Aufforderung zum manuellen Werkzeugwechsel verwendet.
Es verfügt über HAL Pins, die mit dem controller der Maschine verbunden werden können. Die Pins haben den gleichen Namen wie die ursprüngliche AXIS manuelle Werkzeugeingabeaufforderung und funktionieren gleich.
Der Werkzeugwechsel-Dialog kann nur über HAL-Pins aufgerufen werden.
Wenn ein Fokus-Overlay-Widget vorhanden ist, signalisiert es, dass es angezeigt werden soll.
Sie basiert auf der QMessagebox von PyQt.
3.3. FileDialog - Dialog Widget zum Laden und Speichern von Dateien
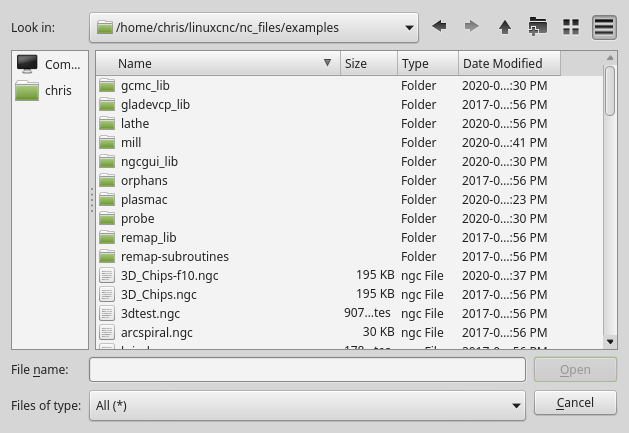
FileDialog: Widget für das Laden und Speichern von DateienDies wird zum Laden von G-Code-Dateien verwendet.
Wenn ein Fokus-Overlay-Widget vorhanden ist, signalisiert es, dass es angezeigt werden soll.
Wenn Sie die Request-Dialog-Funktion von STATUS verwenden, lauten die Standard-Startnamen LOAD oder SAVE.
Es gibt options, die beim Anfordern eines Dialogs gesetzt werden können, diese würden dem Meldungsdiktat hinzugefügt:
-
EXTENSIONS -
FILENAME -
DIRECTORY -
Ein Beispiel für einen Python-Aufruf, für einen Load-Dialog:
mess = {'NAME':'LOAD','ID':'_MY_DIALOG_',
            'TITLE':'Load Some text File',
            'FILENAME':'~/linuxcnc/nc_files/someprogram.txt',
            'EXTENSIONS':'Text Files (*.txt);;ALL Files (*.*)'
            }
ACTION.CALL_DIALOG(mess)
Und für einen Speicherdialog
mess = {'NAME':'SAVE','ID':'_MY_DIALOG_',
            'TITLE':'Save Some text File',
            'FILENAME':'~/linuxcnc/nc_files/someprogram.txt',
            'EXTENSIONS':'Text Files (*.txt);;ALL Files (*.*)'
            }
ACTION.CALL_DIALOG(mess)
Sie basiert auf der QMessagebox von PyQt.
3.4. OriginOffsetDialog - Dialogfeld-Widget für die Einstellung des Ursprungsversatzes
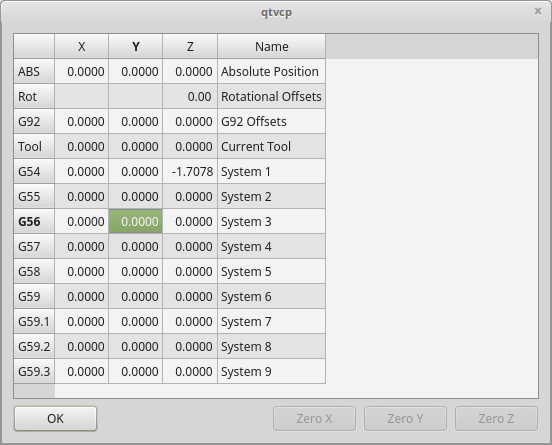
OriginOffsetDialog: Widget zur Einstellung des UrsprungsversatzesMit diesem Widget kann man die Nullpunktverschiebung des Benutzersystems direkt in einem Dialogformular ändern.
Wenn ein Fokus-Overlay-Widget vorhanden ist, wird es angezeigt.
Bei Verwendung der request-dialog-Funktion von STATUS ist der standardmäßige Startname ORIGINOFFSET.
Es basiert auf PyQts QDialog.
3.5. ToolOffsetDialog - Dialogfenster-Widget zur Einstellung des Werkzeugversatzes

ToolOffsetDialog: Werkzeug-Offset-Einstellungsdialog-WidgetMit diesem Widget kann man die Werkzeugversätze direkt in einem Dialogformular ändern.
Wenn ein Fokus-Overlay-Widget vorhanden ist, wird es angezeigt.
Bei Verwendung der request-dialog-Funktion von STATUS ist der standardmäßige Startname TOOLOFFSET.
Es basiert auf PyQts QDialog.
3.6. MacroTabDialog - Dialog-Widget zum Starten von Makros
Dies ist ein Dialog zum Anzeigen des Makrotab-Widgets.
MacroTab zeigt eine Auswahl von Makroprogrammen an, die mit Symbolen ausgeführt werden.
Wenn ein Fokus-Overlay-Widget vorhanden ist, signalisiert es, dass es angezeigt werden soll.
When using ``STATUS``'s request-dialog function, the default launch name is MACROTAB.
Es basiert auf PyQts QDialog.
3.7. CamViewDialog - WebCam Part Alignment Dialog Widget
This is a dialog to display the CamView widget for Webcam part alignment.
When using ``STATUS``'s request-dialog function, the default launch name is CAMVIEW.
Es basiert auf PyQts QDialog.
3.8. EntryDialog - Edit Line Dialog Widget
This is a dialog to display an edit line for information entry, such as origin offset.
It returns the entry via STATUS messages using a Python DICT.
The DICT contains at minimum, the name of the dialog requested and an ID code.
When using ``STATUS``'s request-dialog function, the default launch name is ENTRY.
Es basiert auf PyQts QDialog.
3.9. CalculatorDialog - Calculator Dialog Widget
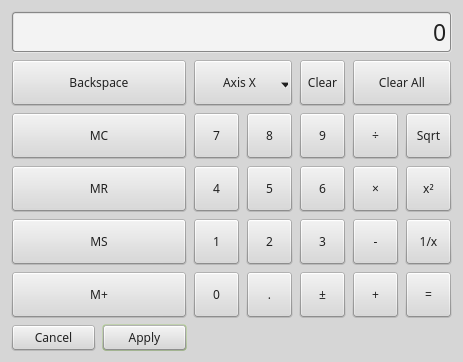
CalculatorDialog: Calculator Dialog WidgetThis is a dialog to display a calculator for numeric entry, such as origin offset.
It returns the entry via STATUS messages using a Python DICT.
The DICT contains at minimum, the name of the dialog requested and an ID code.
When using ``STATUS``'s request-dialog function, the default launch name is CALCULATOR.
Es basiert auf PyQts QDialog.
3.10. RunFromLine - Run-From-Line Dialog Widget
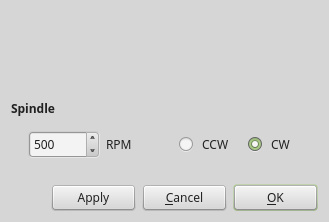
RunFromLine: Run-From-Line Dialog WidgetDialog to preset spindle settings before running a program from a specific line.
Es basiert auf PyQts QDialog.
3.11. VersaProbeDialog - Part Touch Probing Dialog Widget

VersaProbeDialog: Part Touch Probing Dialog WidgetThis is a dialog to display a part probing screen based on Verser Probe v2.
Es basiert auf PyQts QDialog.
3.12. MachineLogDialog - Machine and Debugging Logs Dialog Widget
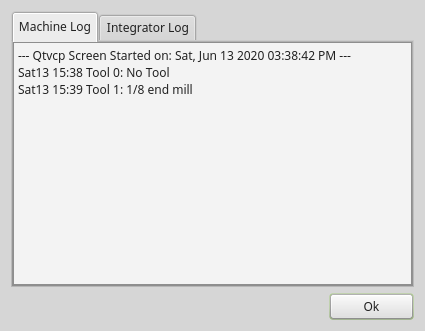
MachineLogDialog: Machine and Debugging Logs Dialog WidgetThis is a dialog to display the machine log and QtVCP’s debugging log.
Es basiert auf PyQts QDialog.
4. Other Widgets
Other available widgets:
4.1. NurbsEditor - NURBS Editing Widget
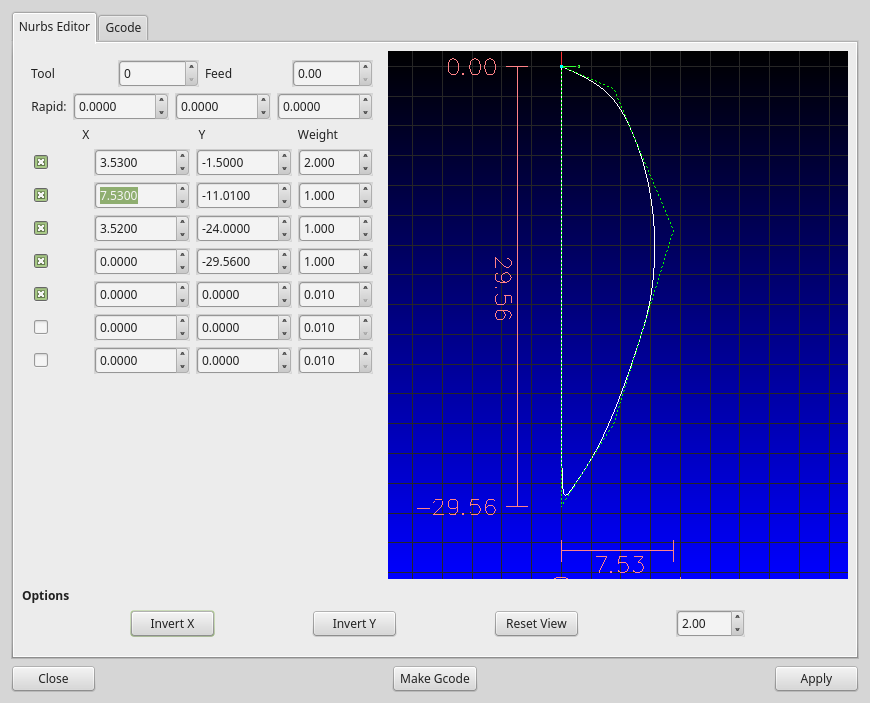
NurbsEditor: NURBS Editing WidgetThe Nurbs editor allows you to manipulate a NURBS based geometry on screen and then convert NURBS to G-code.
You can edit the G-code on screen and then send it to LinuxCNC.
Es basiert auf PyQts QDialog.
4.2. JoyPad - 5 button D-pad Widget
It is the base class for the HALPad widget.
This widget looks and acts like a 5 button D-pad, with a LED like indicators in a ring.
You can put text or icons in each of the button positions.
You can connect to output signals when the buttons are pressed.
There are also input slots to change the color of the indicator(s).
Es gibt aufgezählte Konstanten, die zur Referenzierung von Indikatorpositionen verwendet werden.
Sie werden im Eigenschaftseditor des Qt Designer-Editors oder im Python-Code verwendet.
-
NONE -
LEFT,L -
RIGHT,R -
CENTER,C -
TOP,T -
BOTTOM,B -
LEFTRIGHT,X -
TOPBOTTOM,A -
Für Python-Handler-Code verwenden Sie den Widget-Namen in Qt Designer plus die Referenzkonstante:
self.w.joypadname.set_highlight(self.w.joypadname.LEFT)
def _pressedOutput(self, btncode):
    self.joy_btn_pressed.emit(btncode)
    self[''.format(btncode.lower())].emit(True)

def _releasedOutput(self, btncode):
    self.joy_btn_released.emit(btncode)
    self['joy_{}_pressed'.format(btncode.lower())].emit(False)
As coded these function issue (emit) PyQt5 signals (joy_btn_pressed and joy<letter>_pressed) for the any button pressed or released_.
Signal joy_btn_pressed outputs a string code for the button.
Signal joy_<letter>_pressed outputs a bool value.
You could override the functions to do something else if making a custom widget:
-
reset_highlight() -
Löscht die Hervorhebungsanzeige.
-
set_highlight(_button_, state=_True_) -
Setzen Sie den Hervorhebungsanzeiger an der Position
buttonauf den Zustandstate.
Sie können Strings Buchstaben (LRCTBXA) oder PositionENUMSfür das Argument der Schaltfläche verwenden. -
set_button_icon(_button_, _pixmap_) -
Sets the button’s icon pixmap.
-
set_button_text(_button_, _text_) -
Sets the button’s icon text.
-
set_tooltip(_button_, _text_) -
Legt den beschreibenden Text für die Popup-Tooltip-Schaltflächen fest.
-
setLight(_state_) -
Setzt den Highlight-Indikator auf die Farbe
TrueoderFalse.
Die Funktionset_highlight()muss vorher verwendet werden, um den zu verwendenden Indikator zu setzen.
These signals will be sent when buttons are pressed.
They can be connected to in Qt Designer editor or Python code.
The first two output a string that indicates the button pressed:
-
joy_btn_pressed(string) -
joy_btn_released(string) -
joy_l_pressed(bool) -
joy_l_released(bool) -
joy_r_pressed(bool) -
joy_r_released(bool) -
joy_c_pressed(bool) -
joy_c_released(bool) -
joy_t_pressed(bool) -
joy_t_released(bool) -
joy_b_pressed(bool) -
joy_b_released(bool) -
Sie basieren auf PyQt’s Signal (QtCore.pyqtSignal())
Slots können im Qt Designer-Editor oder in Python-Code verbunden werden:
-
set_colorStateTrue() -
set_colorStateFalse() -
set_colorState(_bool_) - set_true_color(str)
-
set_true_color(_qcolor_) -
set_false_color(_str_) -
set_false_color(_qcolor_) -
Diese können in Stylesheets oder Python-Code festgelegt werden:
-
highlightPosition -
Position des Indikators festlegen.
-
setColorState -
Den Farbzustand des Indikators auswählen.
-
left_image_path -
right_image_path -
center_image_path -
top_image_path -
bottom_image_path -
A file path or resource path to an image to display in the described button location.
If the reset button is pressed in Qt Designer editor property, the image will not be displayed (allowing optionally text). -
left_text -
right_text -
center_text -
top_text -
bottom_text -
A text string to be displayed in the described button location.
If left blank an image can be designated to be displayed. -
true_color -
false_color -
Color selection for the center LED ring to be displayed, when the
BASENAME.light.centerHAL pin isTrueorFalse. -
text_color -
Auswahl der Farbe für den Text des Buttons.
-
button_font -
Auswahl der Schriftart für den Text des Buttons.
Die obigen Eigenschaften könnten gesetzt werden in:
-
Stylesheets:
You would usually use the Qt Designer widget name with#prefix to set individual widget properties, otherwise you would use theJoyPadclass name to set allJoyPadwidgets the same:#joypadname{ qproperty-true_color: #000; qproperty-false_color: #444; }
-
In Python handler code:
self.w.joypadename.setProperty('true_color','green')
self.w.joypadename.setProperty('false_color','red')
4.3. WebWidget
This widget will create a html/pdf viewing page using the QtWebKit or QtWebEngine libraries. The newer QtWebEngine is preferred if both are on the system.
If the QtWebEngine library is used with the Qt Designer editor, a placeholder QWidget will show in Qesigner. This will be replaced with the QtWebEngine widget at run time.
5. BaseClass/Mixin-Widgets
These widgets are used to combine different properties and behaviours into other widgets.
Sie werden als ausklappbare Kopfzeile in der Eigenschaftsspalte von Qt Designer angezeigt.
5.1. IndicatedPushButtons
Diese Klasse verändert das Verhalten von QPushButton.
5.1.1. LED-Anzeige Option
indicator_option puts a LED on the top of the button.
Es kann ein Dreieck, Kreis, obere Leiste oder seitliche Leiste sein.
Die Größe und Position können angepasst werden.
Es wird angezeigt:
-
den aktuellen Zustand der Schaltfläche, oder
-
den Zustand eines HAL-Pins, oder
-
LinuxCNC status.
Diese Eigenschaften sind verfügbar, um den Indikator anzupassen (nicht alle sind auf jede LED-Form anwendbar):
-
on_color -
off_color -
indicator_size -
circle_diameter -
shape_option -
right_edge_offset -
top_edge_offset -
height_fraction -
width_fraction -
corner_radius -
Indicator corner radius.
Die Farbe der LED-Anzeige kann in einem stylesheet definiert werden, indem der folgende Code zur .qss-Datei hinzugefügt wird:
Indicated_PushButton{
  qproperty-on_color: #000;
  qproperty-off_color: #444;
}
Oder für einen bestimmten Button:
Indicated_PushButton #button_estop{
  qproperty-on_color: black;
  qproperty-off_color: yellow;
}
IndicatedPushButton hat exklusive Optionen:
-
indicator_HAL_pin_option -
Fügt ein
halpinnamens<buttonname>-ledhinzu, der den Status der Schaltflächenanzeige steuert. -
indicator_status_option -
Lässt die LED den Status dieser wählbaren LinuxCNC-Status anzeigen:
-
Is Estopped
-
Is On
-
All Homed
-
Is Joint Homed
-
Idle
-
Paused
-
Flood
-
Mist (engl. Nebel)
-
Block Delete
-
Optionaler Stop
-
Manual
-
MDI
-
Auto
-
Spindle Stopped
-
Spindel vorwärts
-
Spindel rückwärts
-
On Limits
Einige
indicator_status_optionsenthält eine Eigenschaft, die mit einem stylesheet verwendet werden kann, um die Farbe der Schaltfläche basierend auf dem Zustand der Eigenschaft in LinuxCNC zu ändern.
Derzeit sind diese Status-Eigenschaften können verwendet werden, um Auto-Stil Schaltflächen:-
is_estopped_statusschaltet die EigenschaftisEstopum -
is_on_statusschaltet die EigenschaftisStateOnum -
is_manual_status,is_mdi_status,is_auto_statusschalten die EigenschaftenisManual,isMDI, undisAutoum. -
is_homed_statusschaltet die Eigenschaft isAllHomed um
-
Hier ist ein Beispiel-Stylesheet-Eintrag, der den Hintergrund von Mode-Button-Widgets festlegt, wenn sich LinuxCNC in diesem Modus befindet:
ActionButton[isManual=true] {
    background: red;
}
ActionButton[isMdi=true] {
    background: blue;
}
ActionButton[isAuto=true] {
    background: green;
}
Here is how you specify a particular widget by its objectName in Qt Designer:
ActionButton #estop button [isEstopped=false] {
    color: yellow;
}
5.1.2. Aktiviert durch den LinuxCNC-Status
Oft, mit der Schaltfläche deaktiviert und aktiviert auf der Grundlage der Zustand der LinuxCNC Motion Controller ist notwendig.
Es gibt mehrere Eigenschaften, die zur Unterstützung ausgewählt werden können:
-
isAllHomedSentive -
isOnSensitive -
isIdleSensitive -
isRunSensitive -
isManSensitive -
isMDISensitive -
isAutoSensitive -
Sie können mehrere Eigenschaften für kombinierte Anforderungen auswählen.
5.1.3. Text Changes On State
Choosing the checked_state_text_option allows a checkable button to change the text based on its checked state.
Es verwendet die folgenden Eigenschaften, um den Text für jeden Zustand anzugeben:
-
true_state_string -
false_state_string -
\\nwird in einen Zeilenumbruch umgewandelt.
Sie können diese in Stylesheets festlegen/ändern:
ActionButton #action_aux{
  qproperty-true_state_string: "Air\\nOn";
  qproperty-false_state_string: "Air\\nOff";
}
5.1.4. Call Python Commands On State
Die python_command_option ermöglicht es, kleine Schnipsel von Python-Code auf Knopfdruck auszuführen, ohne die Handler-Datei bearbeiten zu müssen. Es kann jedoch Funktionen in der Handler-Datei aufrufen.
Bei Verwendung der command_string-Eigenschaften.
-
true_python_cmd_string -
Ein Python-Befehl, der aufgerufen wird, wenn der Button auf
Trueumgeschaltet wird. -
false_python_cmd_string -
Ein Python-Befehl, der aufgerufen wird, wenn die Schaltfläche auf
Falseumgeschaltet wird.
Besondere Wörter in Großbuchstaben geben Zugang zu den folgenden Informationen:
-
INSTANCE -
Ermöglicht den Zugriff auf die Instanzen der Widgets und die Handler-Funktionen.
Z.B.:INSTANCE.my_handler_function_call(True) -
ACTION -
Ermöglicht den Zugriff auf die
ACTIONBibliothek von QtVCP.
Z.B.ACTION.TOGGLE_FLOOD() -
PROGRAM_LOADER -
Ermöglicht den Zugriff auf die
PROGRAM_LOADERBibliothek von QtVCP.
Z.B.,PROGRAM_LOADER.load_halshow() -
HAL -
Ermöglicht den Zugriff auf das Python-Modul von HAL.
Z.B.:HAL.set_p('motion.probe-input','1')
6. Import-Only Widgets
Diese Widgets sind normalerweise die Basisklasse Widget für andere QtVCP-Widgets.
Sie sind nicht direkt im Qt-Designer-Editor verfügbar, können aber importiert und manuell eingefügt werden.
Sie könnten auch unterklassifiziert werden, um ein ähnliches Widget mit neuen Funktionen zu erstellen.
6.1. Automatische Höhe
Widget zur Messung von zwei Höhen mit einer Sonde.
Für die Einrichtung.
6.2. G-Code Dienstprogramm
Widgets for performing common machining processes.
6.3. Facing
Slab or face a definable area with different strategies.
6.4. Loch-Kreis (engl. hole circle)
Drill multiple holes on a bolt hole circle.
6.5. Qt NGCGUI
QtVCP’s version of NGC subroutine selector (Shown as used in QtDragon).
6.5.1. INI-Einstellungen
LinuxCNC needs to know where to look to run the subroutines.
If the subroutine calls other subroutines or custom M codes, those paths must be added too.
[RS274NGC]
SUBROUTINE_PATH = ~/linuxcnc/nc_files/examples/ngcgui_lib:~/linuxcnc/nc_files/examples/ngcgui_lib/utilitysubs
QtVCP needs to know where to open subroutines from.
You can also specify subroutines to be pre-opened in tabs.
[DISPLAY]
# NGCGUI subroutine path.
# This path must also be in [RS274NGC] SUBROUTINE_PATH
NGCGUI_SUBFILE_PATH = ~/linuxcnc/nc_files/examples/ngcgui_lib
# pre selected programs tabs
# specify filenames only, files must be in the NGCGUI_SUBFILE_PATH
NGCGUI_SUBFILE = slot.ngc
NGCGUI_SUBFILE = qpocket.ngc
6.5.2. Buttons
-
NEW TAB - add new blank tab to NGCGUI
-
SELECT PREAMBLE - select a file that add preamble G-code
-
SELECT SUBFILE - select a NGCGUI subroutine file
-
SELECT POST - select a file that add post G-code
-
REREAD FILE - reload the subroutine file
-
CREATE FEATURE - add feature to the list
-
RESTART FEATURE - remove all features from the list
-
FINALIZE GCODE - create the full G-code and send it to LinuxCNC/a file
6.5.3. Adding Custom Subroutines
You can create your own subroutines for use with NGCGUI. They must follow these rules:
-
Um ein Unterprogramm für die Verwendung mit NGCGUI zu erstellen, müssen der Dateiname und der Name des Unterprogramms identisch sein.
-
The subroutine must be in a folder within LinuxCNC’s INI designated search path.
-
On the first line there may be a comment of type info:
-
The subroutine must be surrounded by the sub and endsub tags.
-
Die verwendeten Variablen müssen nummerierte Variablen sein und dürfen keine Nummer überspringen.
-
Kommentare und Voreinstellungen können enthalten sein.
-
If an image file of the same name is in the folder, it will be shown.
(info: feedrate -- simple example for setting feedrate)
o<feedrate> sub
    #<feedrate>       = #1 (= 6 Feed Rate) ; comments in brackets will be shown in ngcui
    f#<feedrate>
o<feedrate> endsub
6.6. Qt PDF
Ermöglicht das Hinzufügen von ladbaren PDFs zu einem Bildschirm.
6.7. Qt Vismach
Verwenden Sie dies, um OpenGl simulierte Maschinen zu erstellen/hinzuzufügen.