1. Innføring
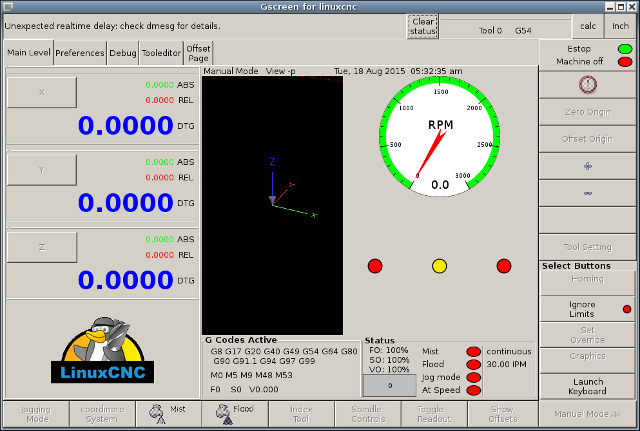
Gscreen is an infrastructure to display a custom screen to control LinuxCNC. Gscreen borrows heavily from GladeVCP. GladeVCP uses the GTK widget editor GLADE to build virtual control panels (VCP) by point and click. Gscreen combines this with Python programming to create a GUI screen for running a CNC machine.
Gscreen is customizable if you want different buttons and status LEDs. Gscreen supports GladeVCP which is used to add controls and indicators. To customize Gscreen you use the Glade editor. Gscreen is not restricted to adding a custom panel on the right or a custom tab it is fully editable.
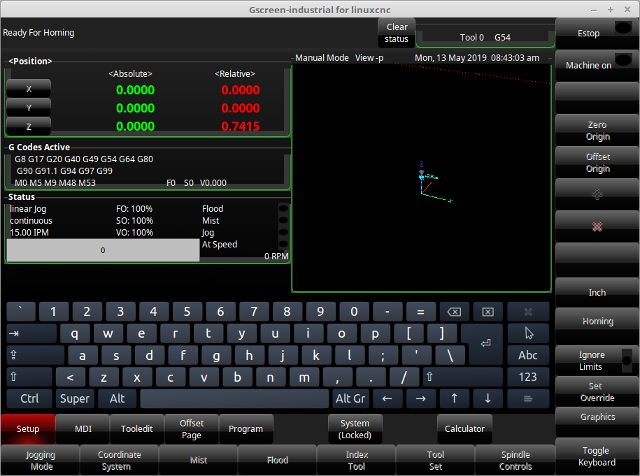
Gscreen is based on Glade (the editor), PyGTK (the widget toolkit), and GladeVCP (LinuxCNC’s connection to Glade and PyGTK). GladeVCP has some special widgets and actions added just for LinuxCNC A widget is just the generic name used for the buttons, sliders, labels etc of the PyGTK toolkit.
1.1. Glade File
A Glade file is a text file organized in the XML standard that describes the layout and the widgets of the screen. PyGTK uses this file to actually display and react to those widgets. The Glade editor makes it relatively easy to build and edit this file You must use the Glade 3.38.2 editor that uses the GTK3 widgets.
1.2. PyGTK
PyGTK is the Python binding to GTK. GTK is the toolkit of visual widgets, it is programmed in C. PyGTK uses Python to bind with GTK.
2. GladeVCP
GladeVCP binds LinuxCNC, HAL, PyGTK and Glade all together. LinuxCNC requires some special widgets so GladeVCP supplies them. Many are just HAL extensions to existing PyGTK widgets. GladeVCP creates the HAL pins for the special widgets described in the Glade file. GladeVCP also allows one to add Python commands to interact with the widgets, to make them do things not available in their default form. If you can build a GladeVCP panel you can customize Gscreen!
2.1. Overview
There are two files that can be used, individually or in combination to add customizations. Local Glade files and handler files. Normally Gscreen uses the stock Glade file and possibly a handler file (if using a sample skin). You can specify Gscreen to use local Glade and handler files. Gscreen looks in the folder that holds all the configuration files for the configuration you selected.
If present, local Glade files in the configuration folder will be loaded instead of the stock Glade files. Local Glade files allow you to use your customized designs rather then the default screens. There is a switch in the INI file to set set the base name: -c name so Gscreen looks for MYNAME.glade and MYNAME_handler.py.
You can tell Gscreen to just load the Glade file and not connect its internal signals to it. This allows gscreen to load any GTK builder saved Glade file. This means you can display a completely custom screen, but also requires you to use a handler file. Gscreen uses the Glade file to define the widgets, so it can show and interact with them. Many of them have specific names, others have Glade given generic names. If the widget will be displayed but never changed then a generic name is fine. If one needs to control or interact with the widget then a hopefully purposeful name is given (all names must be unique). Widgets can also have signals defined for them in the GLADE editor. It defines what signal is given and what method to call.
If you change the name of a widget, Gscreen might not be able to find it. If this widget is referenced to from Python code, at best this makes the widget not work anymore at worst it will cause an error when loading Gscreen’s default screens don’t use many signals defined in the editor, it defines them in the Python code. If you move (cut and paste) a widget with signals, the signals will not be copied. You must add them again manually.
A handler file is a file containing Python code, which Gscreen adds to its default routines. A handler file allows one to modify defaults, or add logic to a Gscreen skin without having to modify Gscreen proper. You can combine new functions with Gscreen’s function to modify behavior as you like. You can completely bypass all of Gscreen’s functions and make if work completely differently. If present a handler file named gscreen_handler.py (or MYNAME_handler.py if using the INI switch) will be loaded and registered only one file is allowed Gscreen looks for the handler file, if found it will look for specific function names and call them instead of the default ones. If adding widgets you can set up signal calls from the Glade editor to call routines you have written in the handler file. In this way you can have custom behavior. Handler routines can call Gscreen’s default routines, either before or after running its own code. In this way you can tack on extra behavior such as adding a sound. Please see the GladeVCP Chapter for the basics to GladeVCP handler files. Gscreen uses a very similar technique.
Gscreen uses the PyGTK toolkit to display the screen. PyGTK is the Python language binding to GTK. GTK supports themes. Themes are a way to modify the look and feel of the widgets on the screen. For instance the color or size of buttons and sliders can be changed using themes. There are many GTK themes available on the web. Themes can also be customized to modify visuals of particular named widgets. This ties the theme file to the Glade file more tightly. Some of the sample screen skins allow the user to select any of the themes on the system. The sample gscreen is an example. Some will load the theme that is the same name in the config file. The sample gscreen-gaxis is an example. This is done by putting the theme folder in the config folder that has the INI and HAL files and naming it: SCREENNAME_theme (SCREENNAME being the base name of the files eg. gaxis_theme). Inside this folder is another folder call gtk-2.0, inside that is the theme files. If you add this file, Gscreen will default to this theme on start up. gscreen-gaxis has a sample custom theme that looks for certain named widgets and changes the visual behavior of those specific widgets. The Estop and machine-on buttons use different colors then the rest of the buttons so that they stand out. This is done in the handler file by giving them specific names an by adding specific commands in the theme’s gtkrc file. For some info on GTK theming (the sample theme uses the pixmap theme engine), see: GTK Themes, Pixmap Theme Engine.
2.2. Build a GladeVCP Panel
Gscreen is just a big complicated GladeVCP panel, with Python code to control it. To customize it we need the Glade file loaded in the Glade editor.
If you have LinuxCNC 2.6+ installed on Ubuntu 10.04 just start the Glade editor from the applications menu or from the terminal. Newer versions of Linux will require you to install Glade 3.8.0 - 3.8.6 (you may need to compile it yourself).
Using a compiled from source version of LinuxCNC open a terminal and cd to the top of the LinuxCNC folder. Set up the environment by entering . ./scripts/rip-environment now enter glade, you see a bunch of warnings in the terminal that you can ignore and the editor should open. The stock Gscreen Glade file is in: src/emc/usr_intf/gscreen/ sample skins are in /share/gscreen/skins/. This should be copied to a configuration folder. Or you can make a clean-sheet Glade file by saving it in a configuration folder.
Ok you have loaded the stock Glade file and now can edit it. The first thing you notice is it does not look in the editor like what it is displayed like Gscreen uses some tricks, such as hiding all boxes of buttons except one and changing that one depending on the mode. The same goes for notebooks, some screens use notebooks with the tabs not shown. To change pages in the editor you need to temporarily show those tabs.
When making changes it is far easier to add widgets then subtract widgets and still have the screen work properly making objects not visible is one way to change the display without getting errors. This won’t always work some widgets will be set visible again. Changing the names of Gscreen’s regular widgets is probably not gonna work well without changing the Python code, but moving a widget while keeping the name is usually workable.
Gscreen leverages GladeVCP widgets as much as possible, to avoid adding Python code. Learning about GladeVCP widgets is a prerequisite. If the existing widgets give you the function you want or need then no Python code needs be added, just save the Glade file in your configuration folder. If you need something more custom then you must do some Python programming. The name of the parent window needs to be window1. Gscreen assumes this name.
Remember, if you use a custom screen option YOU are responsible for fixing it (if required) when updating LinuxCNC.
3. Building a simple clean-sheet custom screen
Lets build a simple usable screen. Build this in the Glade editor (if using a RIP package run it from a terminal after using . scripts/rip-environment ).
-
The top level window must be called the default name, window1 - Gscreen relies on this.
-
Add actions by right clicking, and selecting add as toplevel widget they don’t add anything visual to the window but are added to the right most action list. Add all the ones you see on the top right.
-
After adding the actions we must link the buttons to the actions for them to work (see below).
-
The gremlin widget doesn’t have a default size so setting a requested size is helpful (see below).
-
The sourceview widget will try to use the whole window so adding it to a scrolled window will cover this. (This is already done in the example.)
-
The buttons will expand as the window is made larger which is ugly so we will set the box they are in, to not expand (see below).
-
The button types to use depend on the VCP_action used -eg vcp_toggle_action usually require toggle buttons (Follow the example for now).
-
The buttons in this example are regular buttons not HAL buttons. We don’t need the HAL pins.
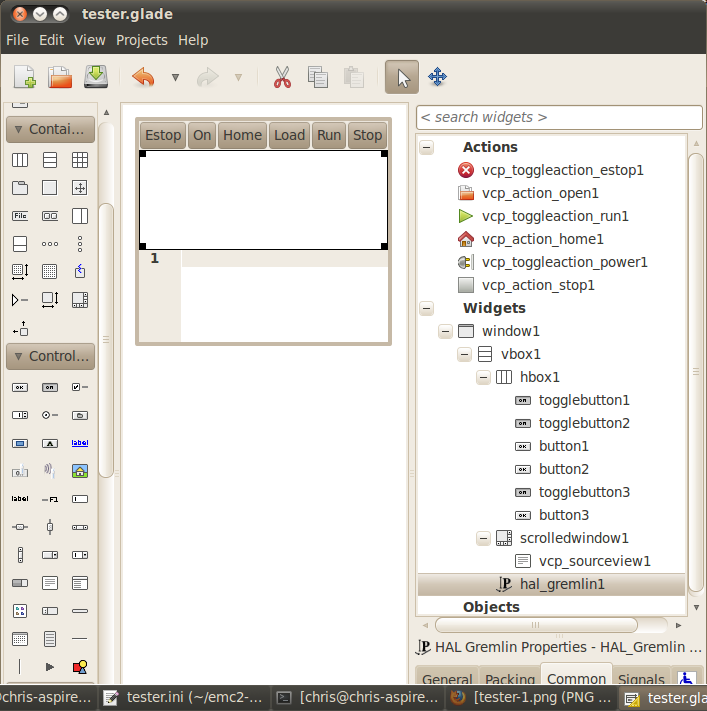
In this screen we are using VCP_actions to communicate to LinuxCNC the actions we want. This allows us standard functions without adding Python code in the handler file. Let’s link the estop toggle button to the estop action Select the estop toggle button and under the general tab look for Related Action and click the button beside it. Now select the toggle estop action. Now the button will toggle estop on and off when clicked. Under the general tab you can change the text of the button’s label to describe its function. Do this for all the buttons.
Select the gremlin widget click the common tab and set the requested height to 100 and click the checkbox beside it.
Click the horizontal box that holds the buttons. Click the packing tab and click expand to No.
Save it as tester.glade and save it in sim/gscreen/gscreen_custom/ folder. Now launch LinuxCNC and click to sim/gscreen/gscreen_custom/tester and start it. If all goes well our screen will pop up and the buttons will do their job. This works because the tester.ini tells gscreen to look for and load tester.glade and tester_handler.py. The tester_handler.py file is included in that folder and is coded just show the screen and not much else. Since the special widgets directly communicate with LinuxCNC you can still do useful things. If your screen needs are covered by the available special widgets then this is as far as you need to go to build a screen. If you want something more there are still many tricks available from just adding function calls to get canned behaviour. To coding your own Python code to customize exactly what you want. But that means learning about handler files.
4. Handler file example
There are special functions Gscreen checks the handler file for. If you add these in you handler file Gscreen will call them instead of gscreen’s internal same-named functions.
-
initialize_preferences(self): You can install new preference routines.
-
initialize_keybindings(self) You can install new keybinding routines. In most cases you won’t want to do this, you will want to override the individual keybinding calls. You can also add more keybindings that will call an arbitrary function.
-
initialize_pins(self): makes / initializes HAL pins
-
connect_signals(self,handlers): If you are using a completely different screen the default Gscreen you must add this or gscreen will try to connect signals to widgets that are not there. Gscreen’s default function is called with self.gscreen.connect_signals(handlers). If you wish to just add extra signals to your screen but still want the default ones call this first then add more signals. If you signals are simple (no user data passed) then you can also use the Glade signal selection in the Glade editor.
-
initialize_widgets(self): You can use this to set up any widgets. Gscreen usually calls self.gscreen.initialize_widgets() which actually calls many separate functions. If you wish to incorporate some of those widgets then just call those functions directly. Or add self.gscreen.init_show_windows() so widgets are just shown. Then if desired, initialize/adjust your new widgets.
-
initialize_manual_toolchange(self): allows a complete revamp of the manual toolchange system.
-
set_restart_line(self.line):
-
timer_interrupt(self): allows one to complete redefine the interrupt routine. This is used for calling periodic() and checking for errors from linuxcnc.status.
-
check_mode(self): used to check what mode the screen is in. Returns a list[] 0 -manual 1- mdi 2- auto 3- jog.
-
on_tool_change(self,widget): You can use this to override the manual tool change dialog -this is called when gscreen.tool-change changes state.
-
dialog_return(self,dialog_widget,displaytype,pinname): Use this to override any user message or manual tool change dialog. Called when the dialog is closed.
-
periodic(self): This is called every (default 100) milliseconds. Use it to update your widgets/HAL pins. You can call Gscreen regular periodic afterwards too, self.gscreen.update_position() or just add pass to not update anything. Gscreen’s update_position() actually calls many separate functions. If you wish to incorporate some of those widgets then just call those functions directly.
You can also add you own functions to be called in this file. Usually you would add a signal to a widget to call your function.
4.1. Adding Keybindings Functions
Our tester example would be more useful if it responded to keyboard commands. There is a function called keybindings() that tries to set this up. While you can override it completely, we didn’t - but it assumes some things:
-
It assumes the estop toggle button is call button_estop and that F1 key controls it.
-
It assumes the power button is called button_machine_on and the F2 key controls it.
These are easily fixed by renaming the buttons in the Glade editor to match. But instead we are going to override the standard calls and add our own.
Add these command to the handler file:
# override Gscreen Functions
# keybinding calls
def on_keycall_ESTOP(self,state,SHIFT,CNTRL,ALT):
  if state: # only if pressed, not released
    self.widgets.togglebutton1.emit('activate')
    self.gscreen.audio.set_sound(self.data.alert_sound)
    self.gscreen.audio.run()
    return True # stop progression of signal to other widgets
def on_keycall_POWER(self,state,SHIFT,CNTRL,ALT):
  if state:
    self.widgets.togglebutton2.emit('activate')
    return True
def on_keycall_ABORT(self,state,SHIFT,CNTRL,ALT):
  if state:
    self.widgets.button3.emit('activate')
    return True
So now we have overridden Gscreen’s function calls of the same name and deal with them in our handler file We now reference the widgets by the name we used in the Glade editor. We also added a built in gscreen function to make a sound when Estop changes. Note that we we call Gscreen’s built in functions we must use self.gscreen.[FUNCTION NAME]() If we used self.[FUNCTION NAME]() it would call the function in our handler file.
Lets add another key binding that loads halmeter when F4 is pressed.
In the handler file under def initialize_widgets(self): change to:
  def initialize_widgets(self):
    self.gscreen.init_show_windows()
    self.gscreen.keylookup.add_conversion('F4','TEST','on_keycall_HALMETER')
Then add these functions under the HandlerClass class:
  def on_keycall_HALMETER(self,state,SHIFT,CNTRL,ALT):
    if state:
      self.gscreen.on_halmeter()
      return True
This adds a keybinding conversion that directs gscreen to call on_keycall_HALMETER when F4 is pressed. Then we add the function to the handle file to call a Gscreen builtin function to start halmeter.
4.2. Linuxcnc State Status
The module Gstat polls LinuxCNC’s state every 100ms and sends callback messages to user functions when state changes. You can register messages to act on specific state changes. As an example we will register to get file-loaded messages when LinuxCNC loads a new file. First we must import the module and instantiate it: In the import section of the handler file add:
from hal_glib import GStat
GSTAT = GStat()
In the handler file under def __init__(self): add:
GSTAT.connect('file-loaded', self.update_filepath)
Then in the HandlerClass, add the function:
self.update_filepath(self, obj, path):
    self.widgets.my_path_label.set_text(path)
When LinuxCNC loads a new file, Gstat will send a callback message to the function update_filepath. In this example we update a label with that path name (assuming there is a label named my_path_label) in the GLADE file.
4.3. Jogging Keys
There are no special widgets to do screen-button jogging, so we must do it with Python code. Under the connect_signals function add this code:
        for i in('x','y','z'):
            self.widgets[i+'neg'].connect("pressed", self['jog_'+i],0,True)
            self.widgets[i+'neg'].connect("released", self['jog_'+i],0,False)
            self.widgets[i+'pos'].connect("pressed", self['jog_'+i],1,True)
            self.widgets[i+'pos'].connect("released", self['jog_'+i],1,False)
        self.widgets.jog_speed.connect("value_changed",self.jog_speed_changed)
Add these functions under the HandlerClass class:
    def jog_x(self,widget,direction,state):
        self.gscreen.do_key_jog(_X,direction,state)
    def jog_y(self,widget,direction,state):
        self.gscreen.do_key_jog(_Y,direction,state)
    def jog_z(self,widget,direction,state):
        self.gscreen.do_key_jog(_Z,direction,state)
    def jog_speed_changed(self,widget,value):
        self.gscreen.set_jog_rate(absolute = value)
Finally add two buttons to the GLADE file for each axis - one for positive, one for negative direction jogging. Name these buttons xneg, xpos, yneg, ypos zneg, zpos respectively. add a SpeedControl widget to the GLADE file and name it jog_speed.
5. Gscreen Start Up
Gscreen is really just infrastructure to load a custom GladeVCP file and interact with it.
-
Gscreen reads the options it was started with.
-
Gscreen sets the debug mode and set the optional skin name.
-
Gscreen checks to see if there are local XML, handler and/or locale files in the configuration folder. It will use them instead of the default ones (in share/gscreen/skins/) (There can be two separate screens displayed).
-
The main screen is loaded and translations set up. If present the second screen will be loaded and translations set up.
-
Optional Audio is initialized if available.
-
It reads some of the INI file to initialize the units, and the number/type of axes.
-
Initializes Python’s binding to HAL to build a non-realtime component with the Gscreen name.
-
GladeVCP’s makepins is called to parse the XML file to build HAL pins for the HAL widgets and register the LinuxCNC connected widgets.
-
Checks for a local handler file in the configuration folder or else uses the stock one from the skin folder.
-
If there is a handler file gscreen parses it, and registers the function calls into Gscreen’s namespace.
-
Glade matches/registers all signal calls to functions in gscreen and the handler file.
-
Gscreen checks the INI file for an option preference file name otherwise it uses .gscreen_preferences =.
-
Gscreen checks to see if there is a preference function call (initialize_preferences(self)) in the handler file otherwise it uses the stock Gscreen one.
-
Gscreen checks for ClassicLadder realtime component.
-
Gscreen checks for the system wide GTK theme.
-
Gscreen collects the jogging increments from the INI file.
-
Gscreen collects the angular jogging increments from the INI file.
-
Gscreen collects the default and max jog rate from the INI.
-
Gscreen collects the max velocity of any axes from the INI’s TRAJ section.
-
Gscreen checks to see if there is angular axes then collects the default and max velocity from the INI file.
-
Gscreen collect all the override setting from the INI.
-
Gscreen checks if its a lathe configuration from the INI file.
-
Gscreen finds the name of the tool_table,tool editor and param file from the INI.
-
Gscreen checks the handler file for keybindings function (initialize_keybindings(self)) or else use Gscreen stock one.
-
Gscreen checks the handler file for pins function (initialize_pins(self)) or else use Gscreen stock one.
-
Gscreen checks the handler file for manual_toolchange function (initialize_manual_toolchange(self)) or else use Gscreen stock one.
-
Gscreen checks the handler file for connect_signals function (initialize_connect_signals(self)) or else use Gscreen stock one.
-
Gscreen checka the handler file for widgets function (initialize_widgets(self)) or else use Gscreen stock one.
-
Gscreen set up messages specified in the INI file.
-
Gscreen tells HAL the Gscreen HAL component is finished making pins and is ready. If there is a terminal widget in the screen it will print all the Gscreen pins to it.
-
Gscreen sets the display cycle time based on the INI file.
-
Gscreen checks the handler file for timer_interupt(self) function call otherwise use Gscreen’s default function call.
6. INI Settings
Under the [DISPLAY] heading:
DISPLAY = gscreen -c tester
  options:
   -d debugging on
   -v verbose debugging on
The -c switch allows one to select a skin. Gscreen assumes the Glade file and the handler file use this same name. The optional second screen will be the same name with a 2 (e.g., tester2.glade). There is no second handler file allowed. It will only be loaded if it is present. Gscreen will search the LinuxCNC configuration file that was launched first for the files, then in the system skin folder.
7. User Dialog Messages
This function is used to display pop up dialog messages on the screen. These are defined in the INI file and controlled by HAL pins:
- MESSAGE_BOLDTEXT
-
is generally a title.
- MESSAGE_TEXT
-
is below that and usually longer.
- MESSAGE_DETAILS
-
is hidden unless clicked on.
- MESSAGE_PINNAME
-
er grunnavnet for HAL-pinnene.
- MESSAGE_TYPE
-
specifies whether its a yes/no, ok, or status message
-
Statusmeldinger
-
will be shown in the status bar and the notify dialog,
-
require no user intervention.
-
-
ok-meldinger
-
require the user to click ok to close the dialog.
-
have one HAL pin to launch the dialog and one to signify it is waiting for response.
-
-
ja/nei-meldinger
-
require the user to select yes or no buttons to close the dialog.
-
har tre HAL-pinner:
-
one to show the dialog,
-
one for waiting, and
-
one for the answer.
-
-
-
Here is a sample INI code. It would be under the [DISPLAY] heading.
# This just shows in the status bar and desktop notify popup.
MESSAGE_BOLDTEXT = NONE
MESSAGE_TEXT = This is a statusbar test
MESSAGE_DETAILS = STATUS DETAILS
MESSAGE_TYPE = status
MESSAGE_PINNAME = statustest

# This will pop up a dialog that asks a yes no question
MESSAGE_BOLDTEXT = NONE
MESSAGE_TEXT = This is a yes no dialog test
MESSAGE_DETAILS = Y/N DETAILS
MESSAGE_TYPE = yesnodialog
MESSAGE_PINNAME = yndialogtest

# This pops up a dialog that requires an ok response and it shows in the status bar and
# the desktop notify popup.
MESSAGE_BOLDTEXT = This is the short text
MESSAGE_TEXT = This is the longer text of the both type test. It can be longer then the status bar text
MESSAGE_DETAILS = BOTH DETAILS
MESSAGE_TYPE = okdialog status
MESSAGE_PINNAME = bothtest
7.1. Copy the Stock Handler/Glade File For Modification
If you wish to use a stock screen but modify its handler file, you need to copy the stock file to your config file folder. Gscreen will see this and use the copied file. But where is the original file? If using a RIP LinuxCNC the sample skins are in /share/gscreen/skins/SCREENNAME Installed versions of LinuxCNC have them in slightly different places depending on the distribution used. An easy way to find the location is to open a terminal and start the sim screen you wish to use. In the terminal the file locations will be printed. It may help to add the -d switch to the gscreen load line in the INI.
Here is a sample:
chris@chris-ThinkPad-T500 ~/emc-dev/src $ linuxcnc
LINUXCNC - 2.7.14
Machine configuration directory is '/home/chris/emc-dev/configs/sim/gscreen/gscreen_custom'
Machine configuration file is 'industrial_lathe.ini'
Starting LinuxCNC...
Found file(lib): /home/chris/emc-dev/lib/hallib/core_sim.hal
Note: Using POSIX non-realtime
Found file(lib): /home/chris/emc-dev/lib/hallib/sim_spindle_encoder.hal
Found file(lib): /home/chris/emc-dev/lib/hallib/axis_manualtoolchange.hal
Found file(lib): /home/chris/emc-dev/lib/hallib/simulated_home.hal
**** GSCREEN WARNING: no audio alerts available - Is python-gst0.10 library installed?
**** GSCREEN INFO ini: /home/chris/emc-dev/configs/sim/gscreen/gscreen_custom/industrial_lathe.ini
**** GSCREEN INFO: Skin name = industrial

**** GSCREEN INFO:  Using SKIN glade file from /home/chris/emc-dev/share/gscreen/skins/industrial/industrial.glade ****

**** GSCREEN INFO:  No Screen 2 glade file present
**** GSCREEN INFO: handler file path: ['/home/chris/emc-dev/share/gscreen/skins/industrial/industrial_handler.py']
The line:
**** GSCREEN INFO: handler file path: ['/home/chris/emc-dev/share/gscreen/skins/industrial/industrial_handler.py']shows where the stock file lives. Copy this file to your config folder. This works the same for the Glade file.